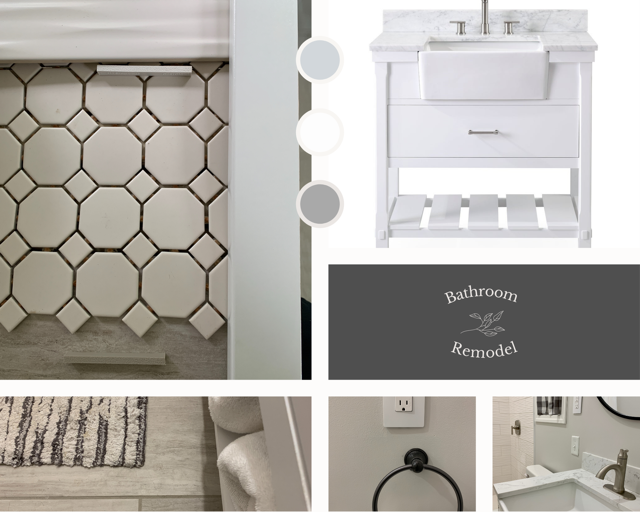
A COMPLETE Bathroom REMODEL!
You know when you buy an older house with a newer add on, there are just constant things on your list of redos to make that home feel more your own. Are you like that? But, this bathroom redo became a COMPLETE small bathroom remodel!
It truly wasn’t intended to be that way, but as it began to unfold, as fate would have it, it snowballed.
One thing led to another.
Is it that way at your house?
It has ALWAYS been this way at this one. My husband ALWAYS knows that changing ANYTHING comes with challenges.
This one did not disappoint.
This is a downstairs second bath. There truly should have been another full bath upstairs between two additional bedrooms. But, those previous owners never finished that one. That “upstairs should be bath” became a storage room, then a gift wrap room, and finally, a “princess bedroom” for my granddaughters and great nieces when they are here. So, that bathroom waits.
Now with 10 of us in our home in a few weeks, the bathroom redo moved to bathroom remodel, had to move up to the top of the list.
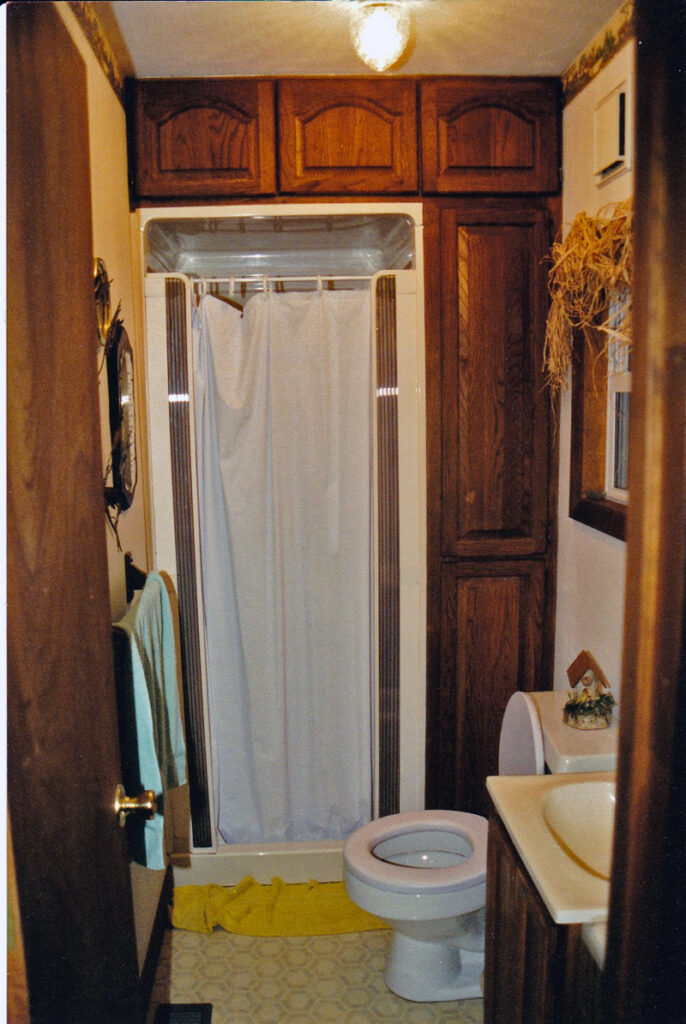
It had been at the top of our list for years. Here’s what was in the house prior to our purchase of the home over 20 years ago. Somehow the deer wallpaper trim and raffia window treatment didn’t fit into my decorating theme. A picture was snapped in a walk through of the house before we purchased and this was how it looked.
A short time in the initial remodel just meant adding a wallpaper that I found at my favorite interior decorator’s shop at the time with accessories to match. A peel and stick tile floor in black and white was all we did.
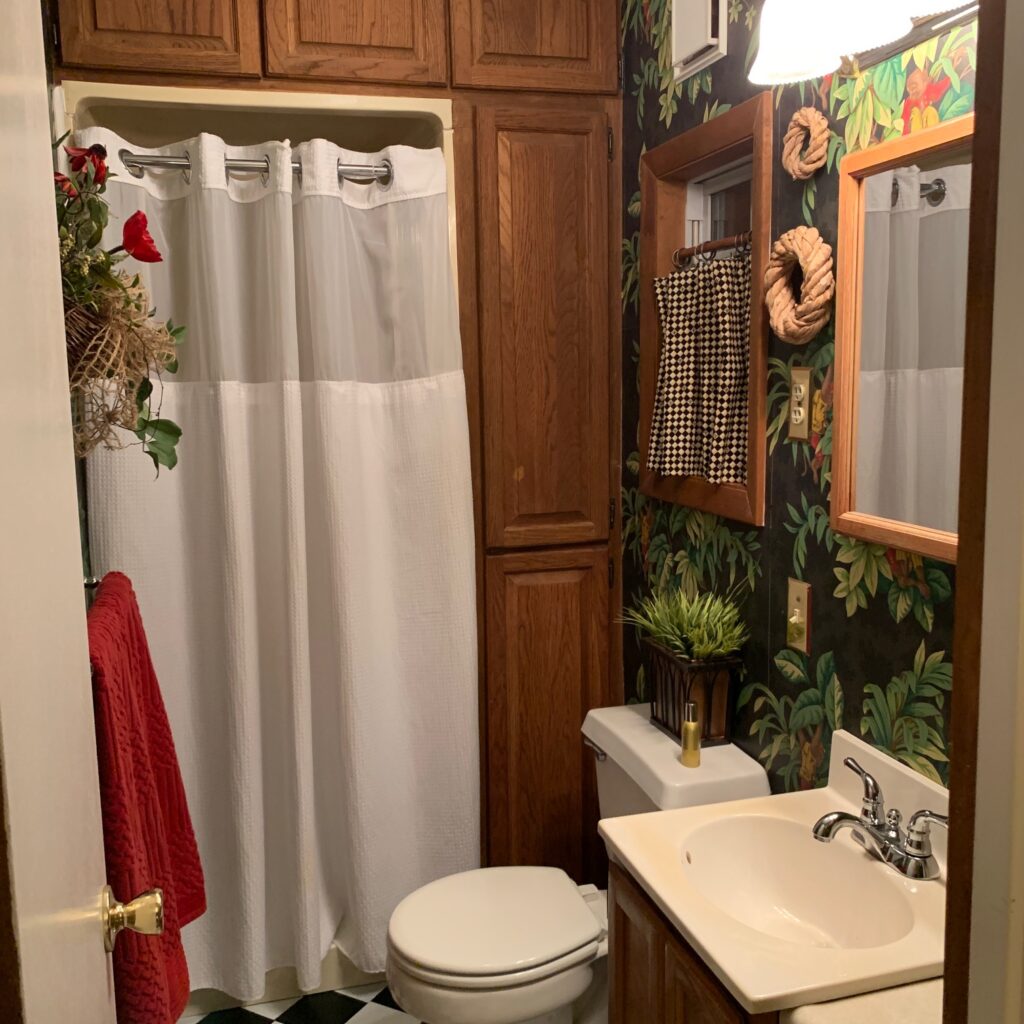
Monkey wallpaper, a monkey lamp and accessories to match. Goodness! It was trending at the time, but, has long been on the list of remodels to get accomplished.
But, other projects on the list changed the priorities.
Things like a complete sealing of the underside of the house; replacing and putting in new gas lines; pulling out and adding new landscaping; redoing electrical boxes; updating the kitchen; creating new master bedroom closets; adding a canning closet; redoing a walk in closet for storage; and beginning the master bathroom remodel.
All since Covid began.
Whew!
There were more gardening projects, yard work, lawnmower repair, front porch redo, and drainage by the road projects. But, this bathroom was long overdue.
You see these previous owners had once owned an RV repair business.
We learned that early on in remodels which made for difficulty in the process of redos.
When the hot water heater line broke and water shot across my laundry room, an RV part was replaced. Goodness!
A new kitchen faucet required replacement of plumbing that was for an RV.
We knew the moment that we walked into this house that the shower in this tiny downstairs bathroom, was, you guessed it, an RV shower.
We began this small bathroom remodel project a couple of years ago.
Finding the tile we liked and purchasing it…it sat in a pile awaiting it’s use for far too long. In fact, I had no clue that grout has an expiration date. Did you?
Now, I am not sure if you have had the same experiences that we have had since this pandemic began, but finding good help has been a challenge. The master bedroom closets brought in 6 contractors to bid for the job. Only one got back with us with an, “I’m sorry, I have another bigger job to do”, response. The one that we finally got to replace a side garage door and willingly agreed to help with the closets, failed to measure the doorway or put the one side of sheetrock on the right side before my husband did the electrical work inside.
Needless to say, we once again began doing our own completion of that project.
But, there are time constraints and job skills and weight limits that as we grow older, we are happy to hand over to a professional.
So, this remodel began.
Tile man was hired.
As he entered that tiny 4′ x 8′ “closet” of a bathroom, his response was: “we need to work on the floor to support the tile”.
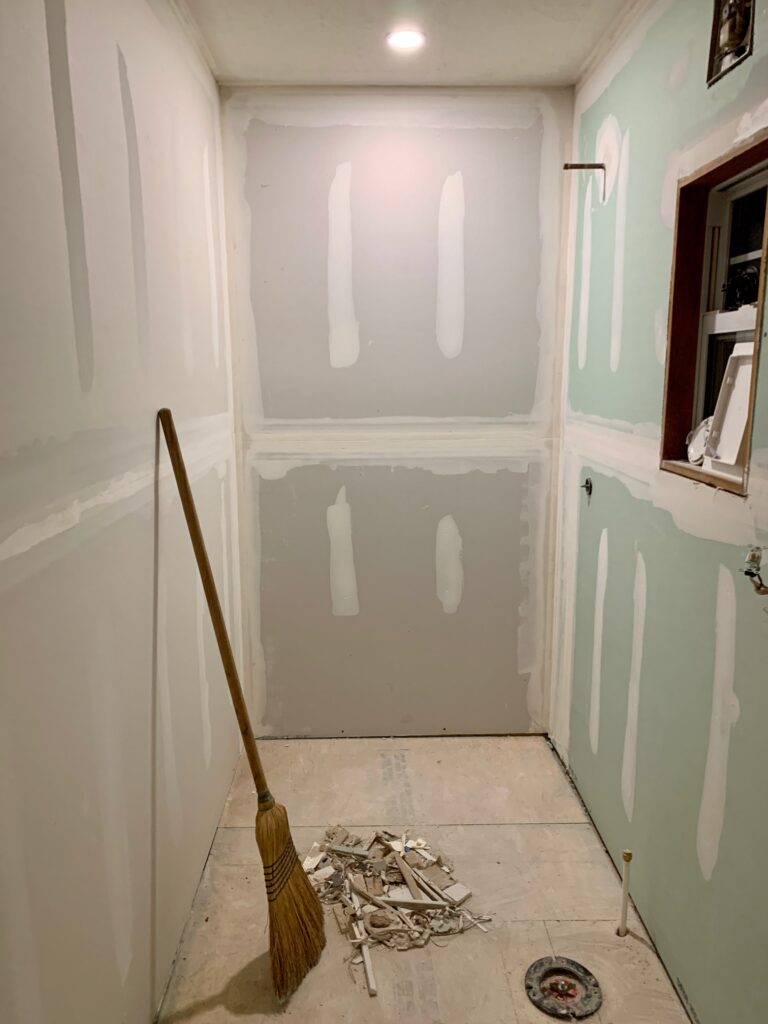
Tile man and my husband began the job of taking out the floor to discover lots of the usual issues we have uncovered all throughout this home.
Next, floor joists running the wrong direction and not put in correctly meant a complete gut job of the floor to begin the bathroom redo.
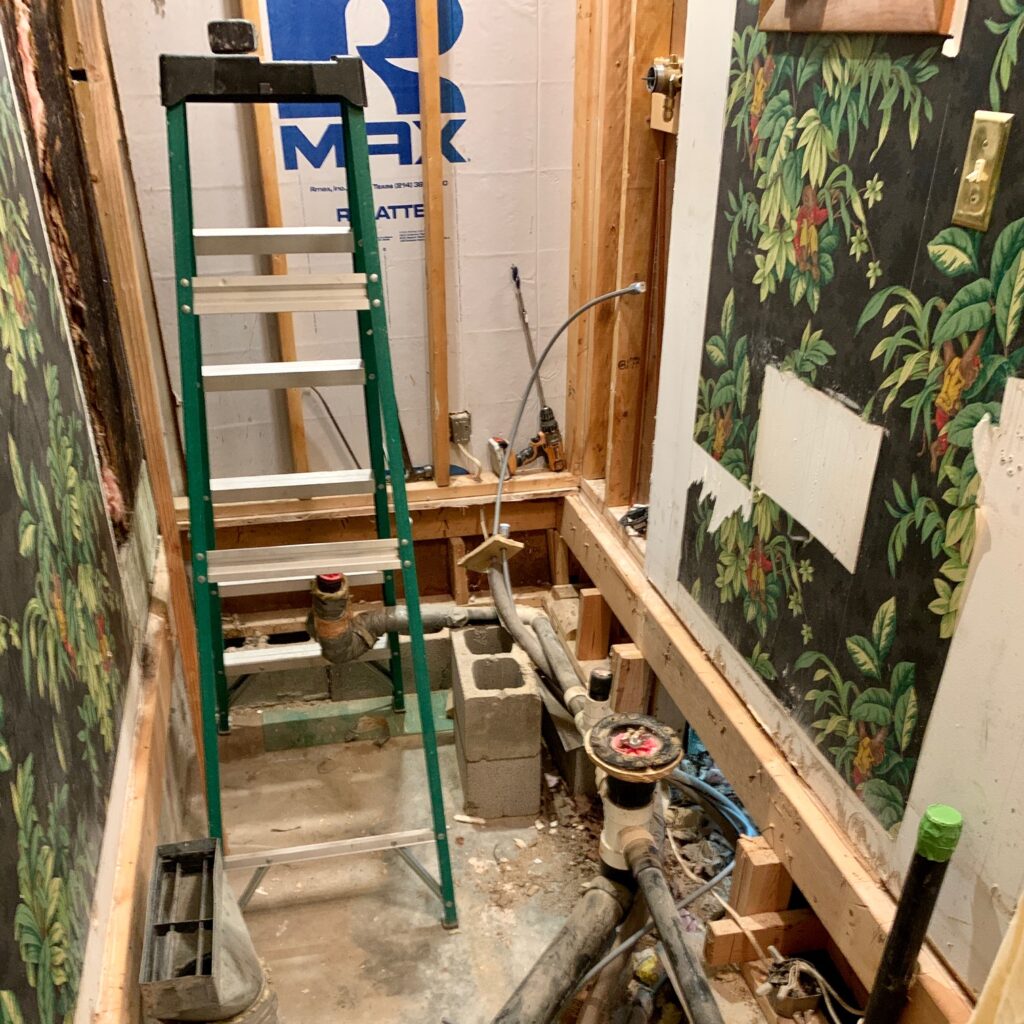
Then, the infamous RV water lines were revealed to be replaced by all new plumbing by my husband. As we moved on with plumbing, we realized when ordering the new commode that it was a 10″ rough in. Perfect for an RV. Not recommended for a personal residence which created more challenges.
There were electrical issues, as always, that as we find, are redone with the correct procedures for safety.
The story board for this project began with the following list:
- Tile for the walk in shower
- Flooring tile
- Vanity– not an easy task for this tiny bathroom dimensions!
- New commode- 10″ rough in and round requires special ordering-ugh!
- Mirror
- Lighting
- Faucet and Shower fixtures
- Shower door
- Wall color
- Window treatment
- Trim for doors, windows and baseboard replaced
- Outlet covers replacements
- Linens and accessories
Tile man had lots of inventory.
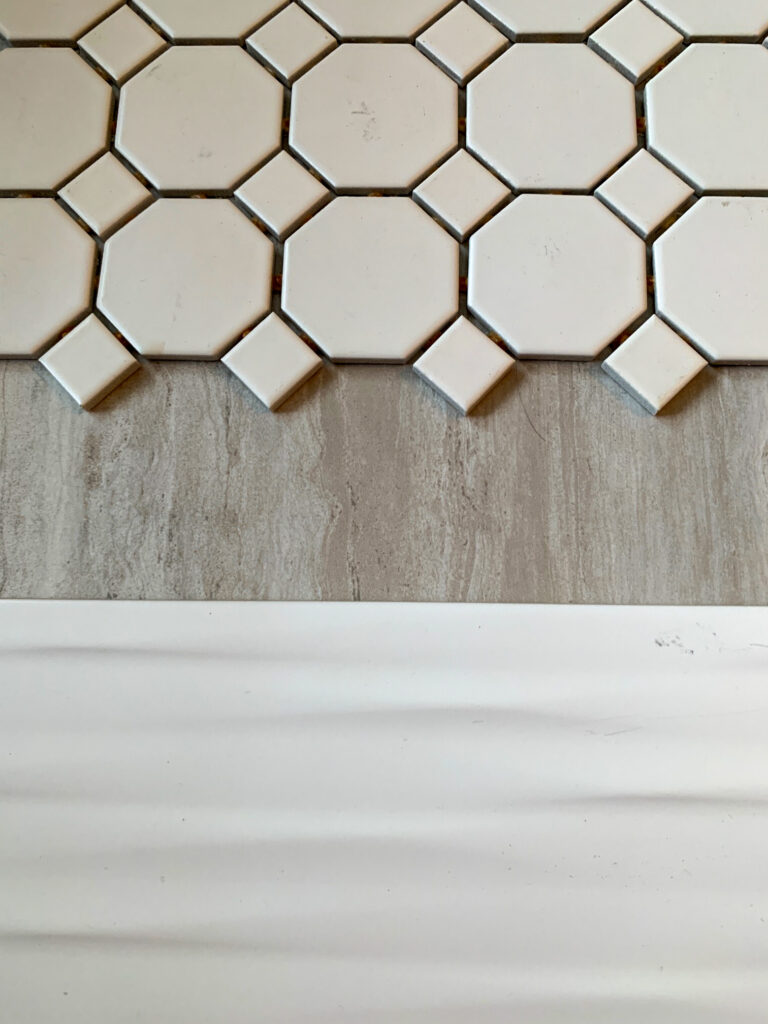
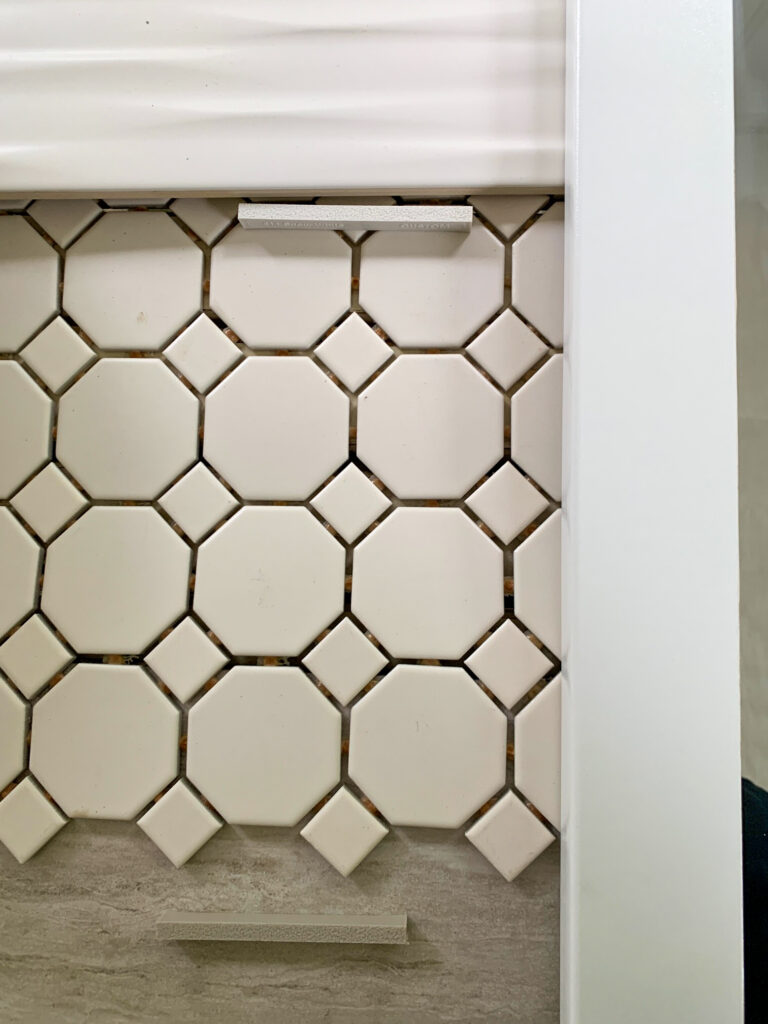
As we went to his “showroom”, I found the perfect floor tile and shower floor tile to finish that walk in shower.
That lovely monkey wallpaper? As I began to try to remove that, it became apparent to all of us that just replacing the sheetrock would be better for Tile man and me!
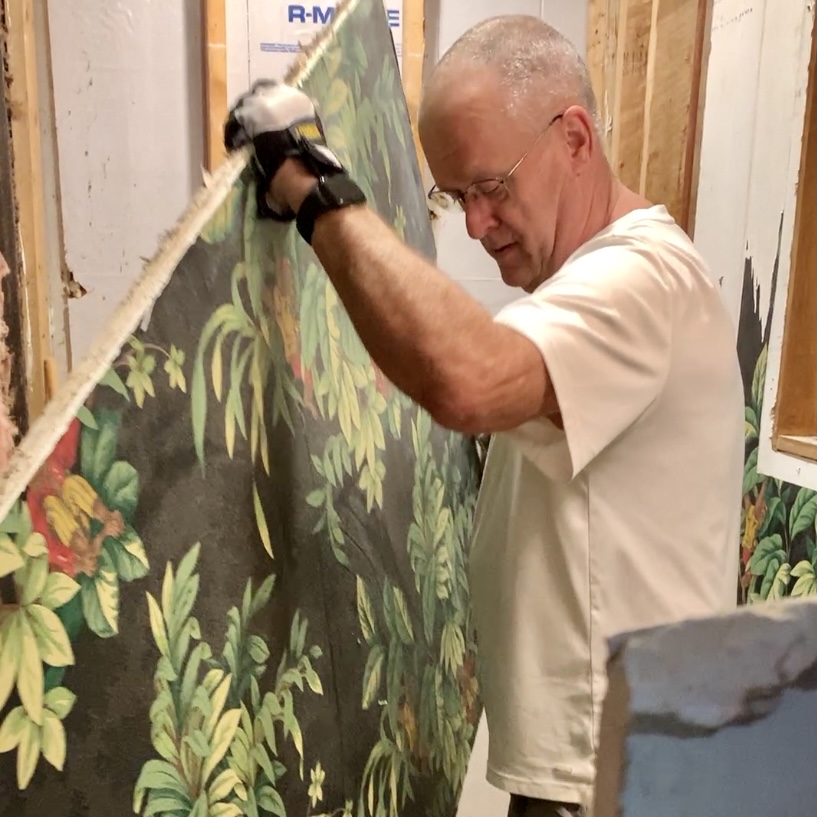
Enter Sheetrock Jim
Sheetrock Jim appeared on the scene which made me very happy! My husband had added can lights to the ceiling and that horrible textured ceiling needed to be replaced.
Sheetrock Jim said, “no worries, it’s as easy to skim that ceiling!”
NOTE: painted ceilings are nearly impossible to sand and resurface. Tip noted.
I was over the moon! Only 9 more rooms to go in removing those horrible ceilings in this house! I’m wondering if I can hire him full time!
We began to get selections ticked off of that bathroom remodel list.
One by one off they went.
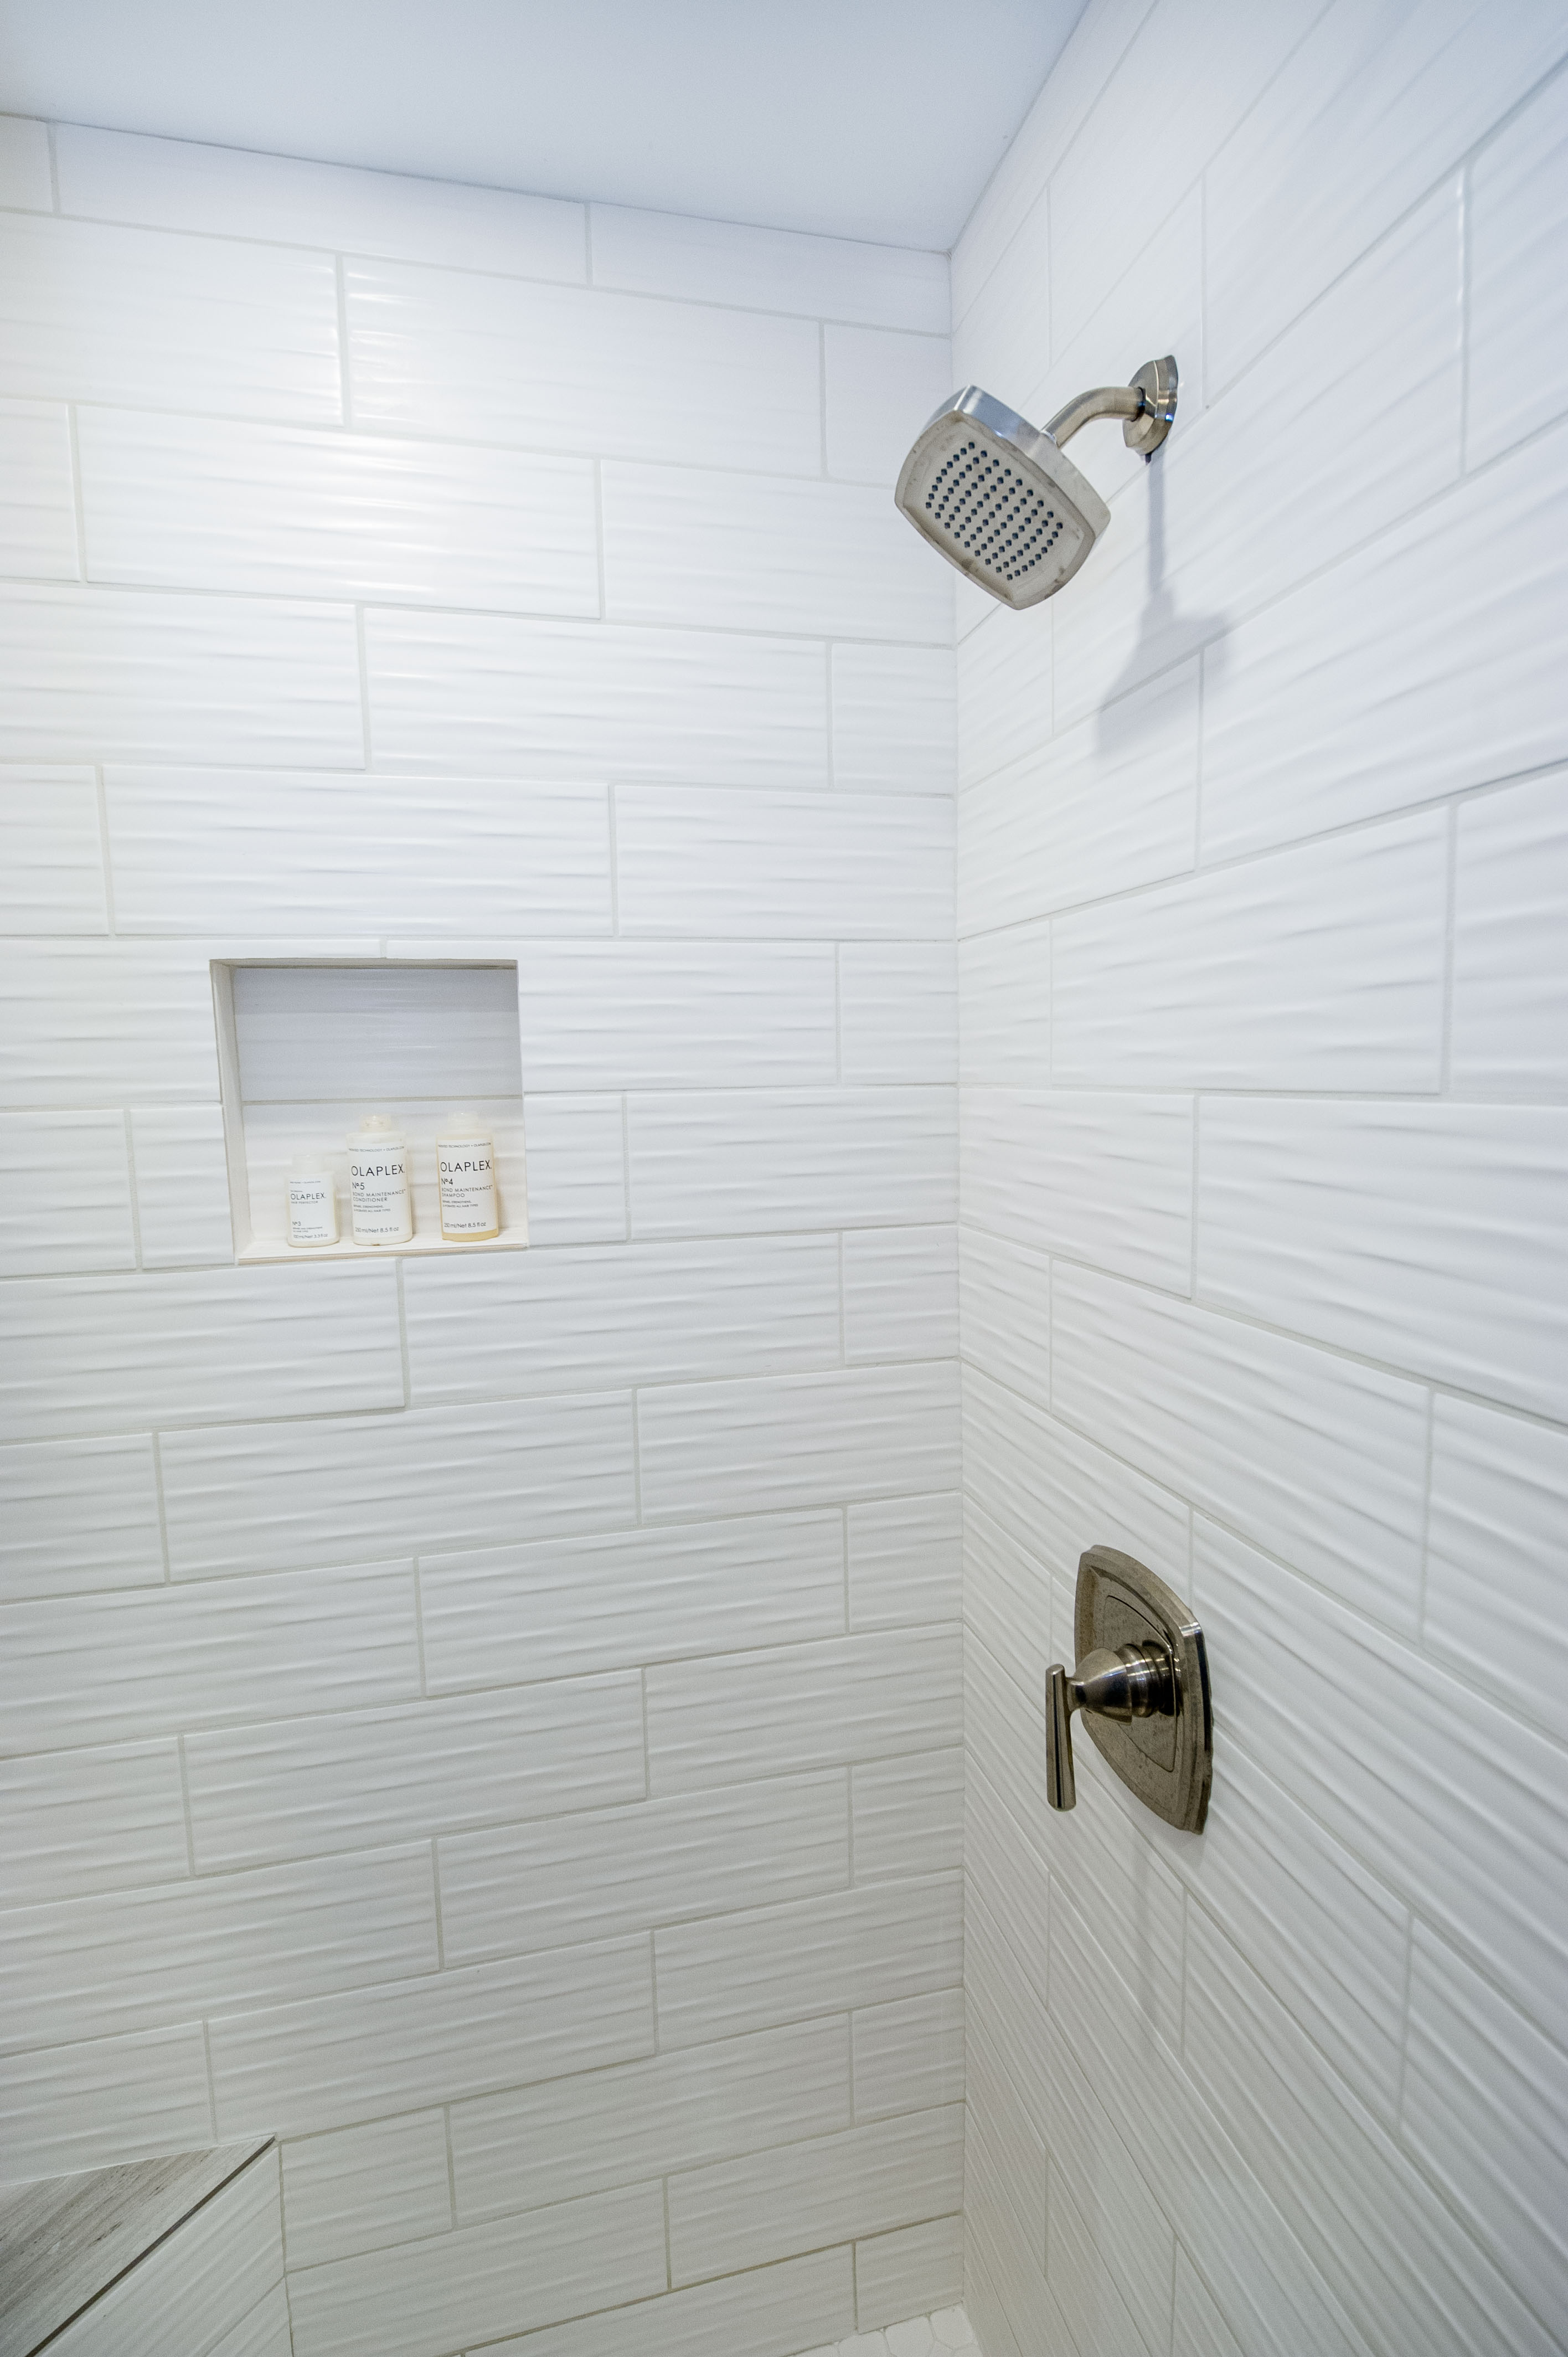
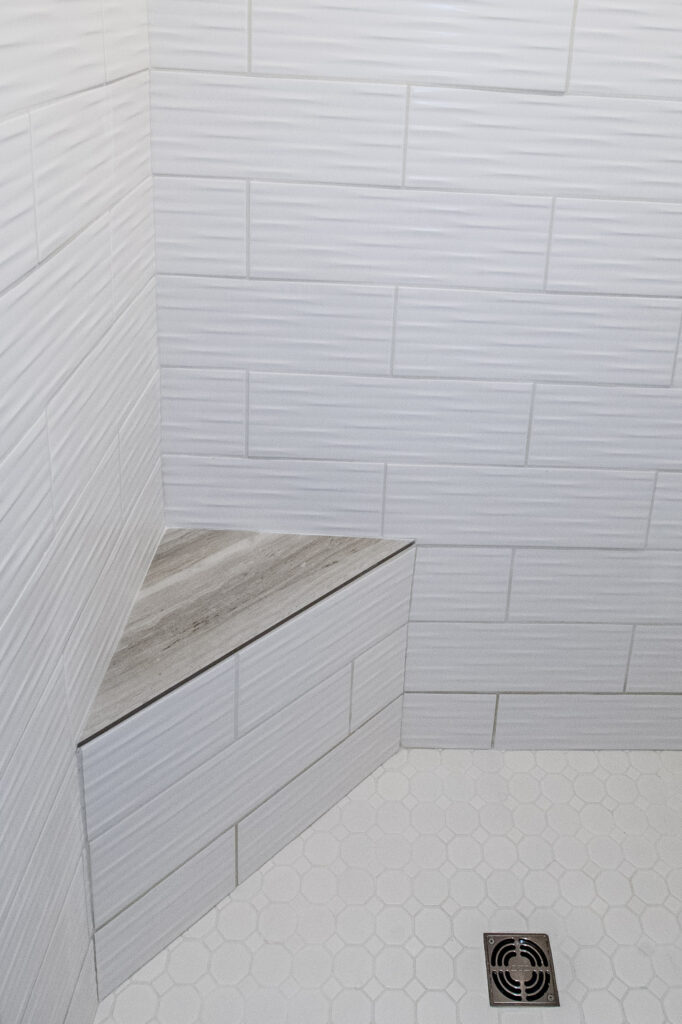
Tile for the shower. Check! Decisions for the inset and seat and shower floor tile made. Tile for the floor picked. Light fixture decision made.
Vanity purchased. The farmhouse sink in a bathroom? It was such better quality than your local box stores, that I went for it. A faucet was included. The holes limited the one that would fit. But, a win to have it included in the vanity purchase.

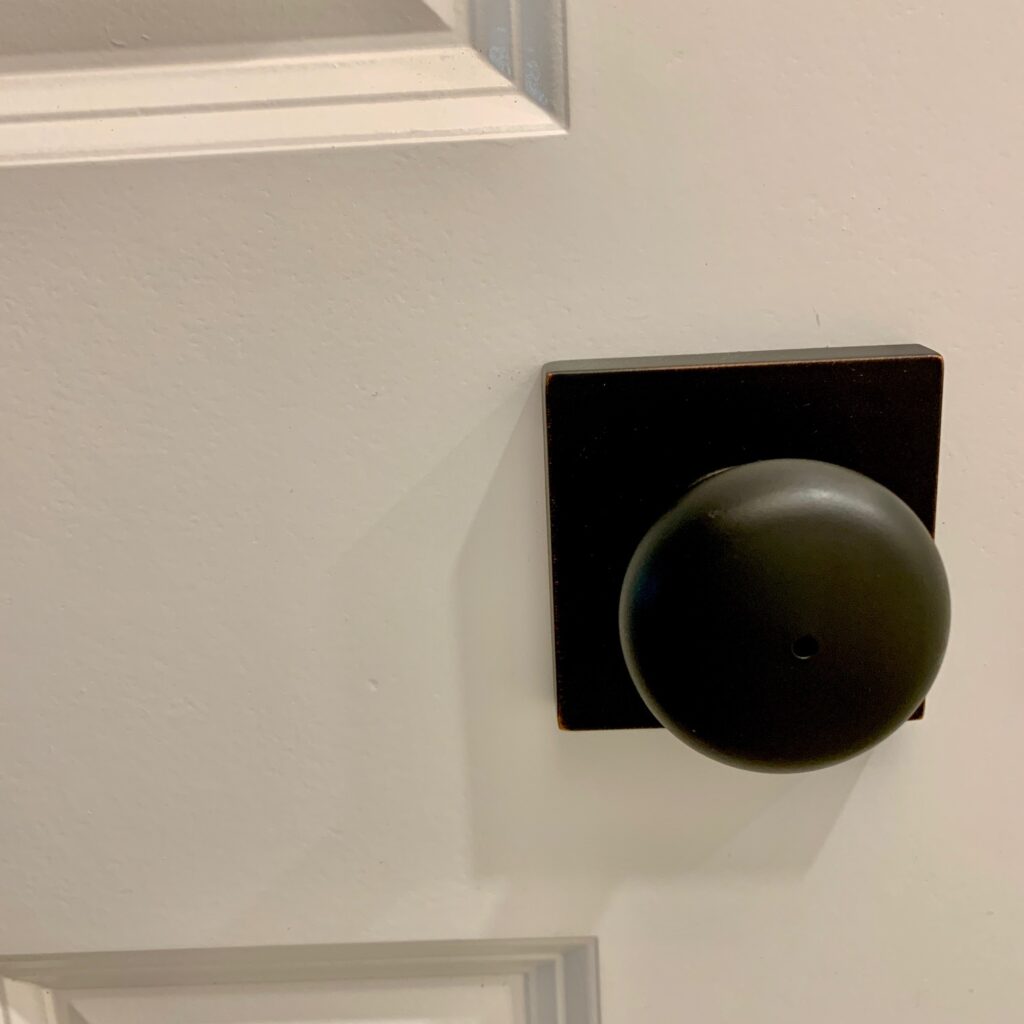
A new door was purchased. New door handles selected and installed.
Next, it was on to the races for that bathroom completion.
Can lights installed by that handy husband.
Sheetrock Jim came and hung and mudded and sanded those walls and ceiling to perfection.
NOTE: sheetrock dust cleanup added to the race for completion!
Tile man began laying the tile for the floor and then began the shower.
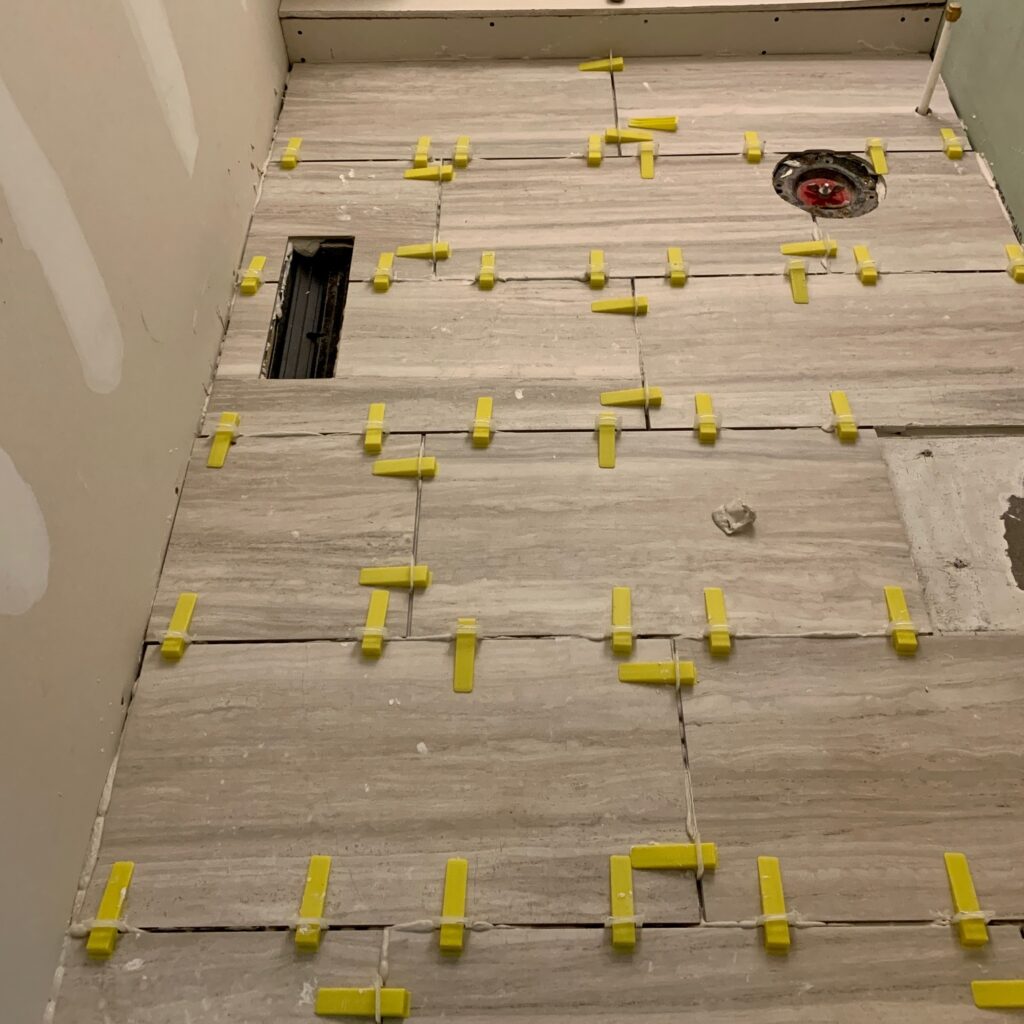
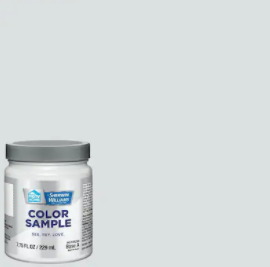
Finding the right paint color now that the project was in full swing was my next challenge.
Light and bright was truly what that tiny closet of a bathroom needed. Off I went to select a color that complimented the variations of white and cream and gray that were found in that room.
Now, I’m not the best at color matching! Four rounds of colors swathed on those walls and I finally found a Sherwin Williams Icy Avalanche color that suited the walls for that tiny room. We painted those walls before finishing shower tile was complete and after Sheetrock Jim was finished with his final finish.
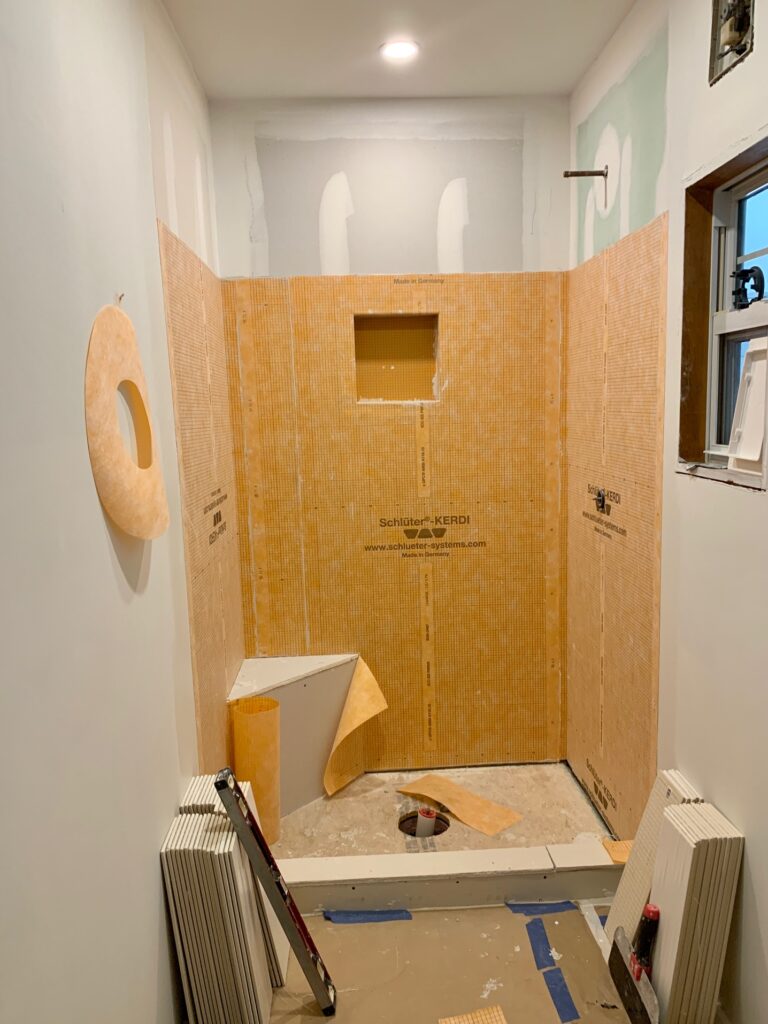
After painting was complete, Tile Man added in the Schluter system, the seat and inset and completed the walk in shower!
Adding in all of those great selections was next in order of the bathroom redo.
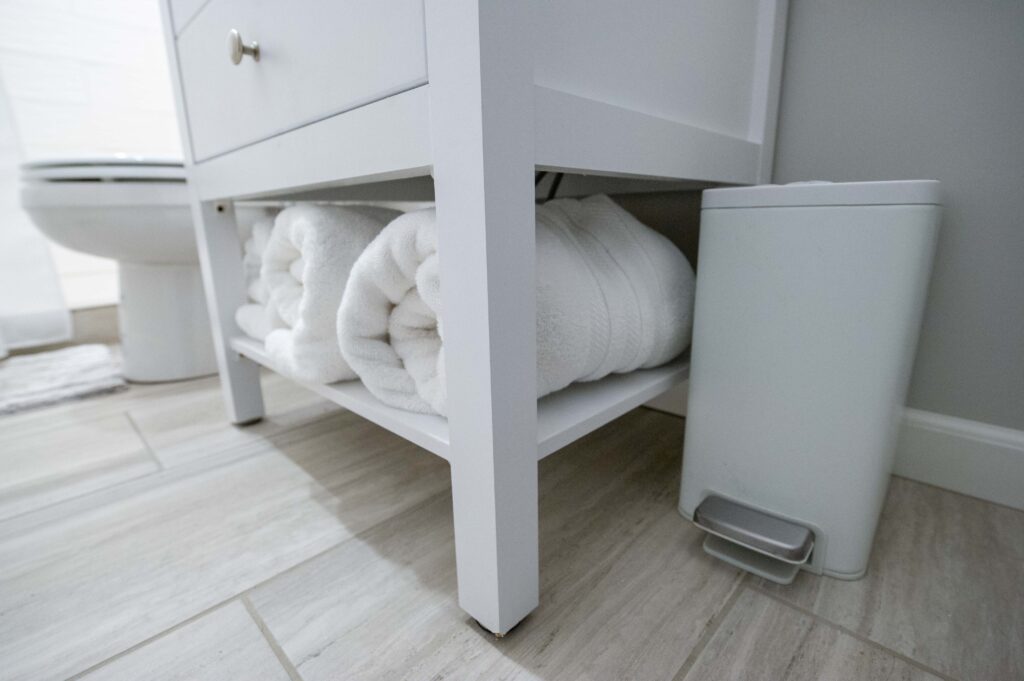
The new vanity was slipped into place; new mirror hung; towel ring selected and hung; new commode installed, lights hung and outlets finished.
NOTE: I’m in love with the new outlet covers that have no screws in them! They simply pop in. Have you seen them?
It was truly a new room!
After tile man finished the walk in shower, we added the new shower head and handle and a shower curtain to complete it for now. Sliding doors will be added in the future, but no time for adding them before the arrival of guests.
This was my choice for the shower curtain from Amazon. It’s an 84″ length which I couldn’t find at my local box stores. A new mildew resistant liner, rod and rings finished the look.


These are similar to the ones I found at Home Goods.

The next step was adding the trim.
Newly painted baseboards and trim around the window and doorframe completed the look. Originally, a wide baseboard was selected; but, after placing it next to the shower base, it was clear that we needed a narrower one. Bummer!
Finishing touches with accessories made my heart sing!
New towel hooks, a stand toilet paper holder (that provided tissue storage for that small bathroom) and gorgeous white towels were the next order of business to add in.
Home Goods came to the rescue again for these.
The round mirror was the perfect size for the vanity; however, I felt that the trend of different metals really needed to happen with this one. My husband is amazing. He taped off that silver mirror and sprayed it a satin black to match the door handle and towel hooks and hand towel rack. He’s a keeper for sure.
Can I give you some small bathroom remodel ideas?
- Keep it as light and bright as you can to open up the space. I have had my turn at dark and wallpaper and was so ready for this look.
- Add a walk in shower to make the best use of the space.
- Use fixtures that allow for more space–we had a 10″ rough in for the commode (I’m sure RV compatible!) Goodness! But, selecting a round commode instead of an elongated one gave us more room.
- Add hooks instead of rods for your towels. We hung them higher to keep towels up and open the area.
- Follow the trend of mixing the metals with bronze, black and brushed nickel to add more interest since there’s little room for shelving and other decorating.
- Use can lights to open up the ceiling and make the room appear lighter and brighter.
- White towels were the perfect finishing touch to keep it bright and clean.
- Color in the rug, floor, grout and curtain were kept soft and muted to help the overall look of that bathroom remodel.
So very happy with the results!
We can now move this project off of the remodel to do list! It’s finished! Complete! Well, at least until the shower door completion. I am so happy with the shower curtain, that I may leave it as is. Adding a new roman shade to the window will probably happen in the future; but, for a quick fix, I loved this check fabric hung by ring clips.
What do you think?
My heart is so happy when creating a welcoming home is part of a project. It’s part of that hospitality gene God created in me.
It’s a part of me that just never gets turned off! Does that happen to you?
I’d love your feedback on this one!
Happy Remodeling, friends! I hope your projects and “to do” lists are bringing great results and much joy to your home!
Affiliate links included for your shopping convenience…at no extra cost to you!


51 Comments
Christy Green
Great job! Looks amazing!
Cindy
Wow Leslie, these people were amazing. How did this happen with RV parts everywhere?
I feel blessed to live in NJ because, this never would have passed alone inspection.
NJ has such tough regulations and home inspections for the buyers. It’s amazing what we had to fix on our home when we sold it. We were obsessed with upkeep on our home too.
It was like getting new house.
Taking the sheet rock down was the wY to go
Too bad COVID happened too onto of reno.
Leslie J Watkins
Thank you! I truly am thankful that it is finished. We love it.
Renae
It looks amazing! What a transformation.
Leslie J Watkins
Thanks, Renae. I am very pleased with the results and so very thankful it is done!
Lynne
Wow! What a beautiful transformation, Leslie! It looks amazing! Pinned!
Leslie J Watkins
Thanks, Lynne. We love the end result and are thankful it is completed!
LARK HIGGINBOTHAM
It is beautiful! I am wanting to do a bathroom remodel in my house. Need to find a good contractor.
Leslie J Watkins
We are working on the master bathroom remodel now. Finding a contractor was the challenge here. Gary did a great deal of this project. It was great to hand off the tile and sheetrock work to others though.
Vickie Ramey
Absolutely gorgeous! And it looks so much bigger! SO glad to see those monkeys gone! Gary and you are a such an amazing team–you on design and Gary on construction! What’s next on your to-do list?
Leslie J Watkins
Awwwww…you didn’t like the monkeys? hahaha Finishing the master bedroom and bath are next on the list! stay tuned!
Lynn Vogeler
What a change. So open and airy! I bet you love it
Leslie J Watkins
We do love it, Lynn! Love the light and bright feel and that shower is amazing!
elizabeth@pineconesandacorns
It looks fabulous! We remodeled 4 baths at our last house and will be doing 3 in this one! I love light, bright and airy.
Leslie J Watkins
Goodness, Elizabeth! I’m not sure I would survive 7 bathroom remodels! I cannot imagine. I’m sure you are thankful that you are not living in this one while it all is remodeled. Can’t wait to see all of your new transformation with this new home.
Heather Krout
I LOVE this bathroom transformation Leslie! It is PERFECTION! Especially love the vanity and farmhouse sink you selected! Just loving your blog Leslie – thank you for sharing your heart and home with us! XO, Heather
Tammy
Leslie, this project turned out amazing.
Leslie J Watkins
Thank you, Tammy. I am so happy with it!
Leslie J Watkins
Thank you, Heather. That means alot coming from the amazing designer that you are! Isn’t that the best find for a vanity? I am in love with the all of it. Thank you for stopping in to see it all. Love having you share life with me here.
Cindy Walker
You created a small bathroom into an airy & absolutely gorgeous bathroom. Job well done!
Grace Decken
Wow! What an awesome job!!Love every bit of it!!!
Mary Anne Russo
Wow Leslie what a transformation! The bathroom looks great! Love all of the updates and the colors are so neutral and very in! You have a great style!
Rosemary Palmer
What a great transformation. So much lighter and brighter. Love the tile
Corine
Wow, it looks amazing!! Older homes are no joke when it comes to renovations.
Melba
Incredible transformation! It looks so fresh!
Marie
What a transformation! The space looks bigger and brighter for sure. So pretty.
RV parts?? People do some strange things. Our house was full of things that made us scratch our heads ha ha.
Leslie J Watkins
I know, right! We are constantly shocked at the strange things we find and always thankful when they are found and corrected. Thank you for stopping by! And, as always, for your encouragement!
Paula@SweetPea
You guys did an amazing job on this renovation. It looks wonderful!
Leslie J Watkins
Thank you, Paula. I am pleased and thankful it is completed!
Barbara at Mantel and Table
Wow Leslie! What a transformation! I’d say all that was totally worth it. Thanks for the inspiration!
Leslie J Watkins
Thank you, Barbara! It was totally worth it! So thankful it is finally finished!
Jayne
Wow! Leslie, what a transformation, it’s gorgeous! So sorry you had to deal with all of that RV stuff – what a pain!
Leslie J Watkins
Thanks, Jayne. I know, right? Every time we hold our breath and say a prayer that we won’t find weird stuff. We are working on the master bathroom next. Goodness! Hoping it’s an easier project!
Peggy
Hey Leslie,
Love the ideas for a small bathroom. Our new house has a small powder room with very outdated wallpaper. I will definitely keep your ideas in mind when we remodel.
We are also finding some very odd things out about our new house. We are eager to transform it into our house/home.
Leslie J Watkins
Isn’t it amazing the weird things people do in remodels? It’s crazy here! We just have to always be ready for the odd things to occur with each new project. We are beginning the master bathroom now. Wish us luck and say a prayer!
Cindy Rust
That bathroom looks amazing! Well done with the colors and the tile and everything! That is crazy that the previous owners used RV parts! You did a great job designing this Leslie!!
Leslie J Watkins
Thanks, Cindy. I know, right? I keep hoping that we have cleared ALL of the RV parts out every time we finish a new project. Beginning the master bathroom redo now and I am hoping there is no other surprises there!
Martha Wallace
Stunning! Can’t believe that was once the monkey bathroom! Wow!
Leslie J Watkins
Thank you! I know! You’ll have to come by to see it in person!
Carol Karl
Your bathroom is just like mine – tiny. Just this week I’ve been drawing up floor plans of how we can better make it work if we remove the wall between the toilet and bathroom – still tiny. Thanks so much for sharing this. It’s very timely.
Leslie J Watkins
Thanks, Carol! Yes. Tiny and long overdue for a makeover. Hope all my ideas are helpful to you!
Juliet
Wow, Leslie … from tragic to triumph! You’ve made this bathroom look twice the size with your light and bright choices. I love your shower pan tile … we used the same in our small bath. It’s timeless. Do you walk by this room 10x a day just to admire your beautiful work? I sure would. It’s fabulous! xo
Leslie J Watkins
Thank you, Juliet. That means so much coming from you! I truly love this tiny bathroom. Everyone is amazed at how much larger and open it looks with that white tile. I am so happy to tick that room off the list! So many others to finish!
Cheryl
I love this! We need our bathroom downstairs done. The quote for just doing the shower work is almost $7000 and that is not including the tile we already have. We are going to try and do it ourselves but I’m not sure how it will turn out! Love yours.
Leslie J Watkins
I know! I was not prepared for all of the costs for everything. Those hired did a great job, though, and I am thankful that I found them. I haven’t totaled all of the costs, but it was thousands under your shower quote!
Pingback:
Pingback:
Pingback:
Pingback:
Pingback:
Pingback: