Week 6: How to Hang Peel and Stick Wallpaper
Did you miss our update last week? With family events happening last week…the bathroom was a bit lonely. This week is how to hang peel and stick wallpaper in the One Room Challenge Bathroom Renovation! This challenge has been great in pushing us to begin and end a project and think through every detail each step of the way.

If you are in need of someone to cheer you on in the process of a room renovation, I’ll be your cheerleader! Likewise, if you could be my cheering section in the comments each week…you would be my new hero!
Don’t forget to follow along on Instagram @Feetundermytable, @oneroomchallenge, and @apartmenttherapy to see how projects in the one room challenge are coming along! More to be inspired by there.
So, what’s happened since we last shared an update?
- Bead board ceiling nails and seams have been filled and painted.
- Wall behind vanity has been primed and painted in preparation for wallpaper.
- Crown molding and paint colors have been selected.
- And…the bidet has been ordered.
Now, onto what’s been happening this week.
Steps in How to Hang Peel and Stick Wallpaper
Step 1: Selecting Peel and Stick Wallpaper
When selecting wallpaper, consider the type of look you want.
If you want a dramatic or formal look, you might choose larger designs or even deeper colors. That’s what I did in the small bathroom with a black and red/green print image before we remodeled it.
If you want a more fun or cheerful look, a smaller or brighter design works well.
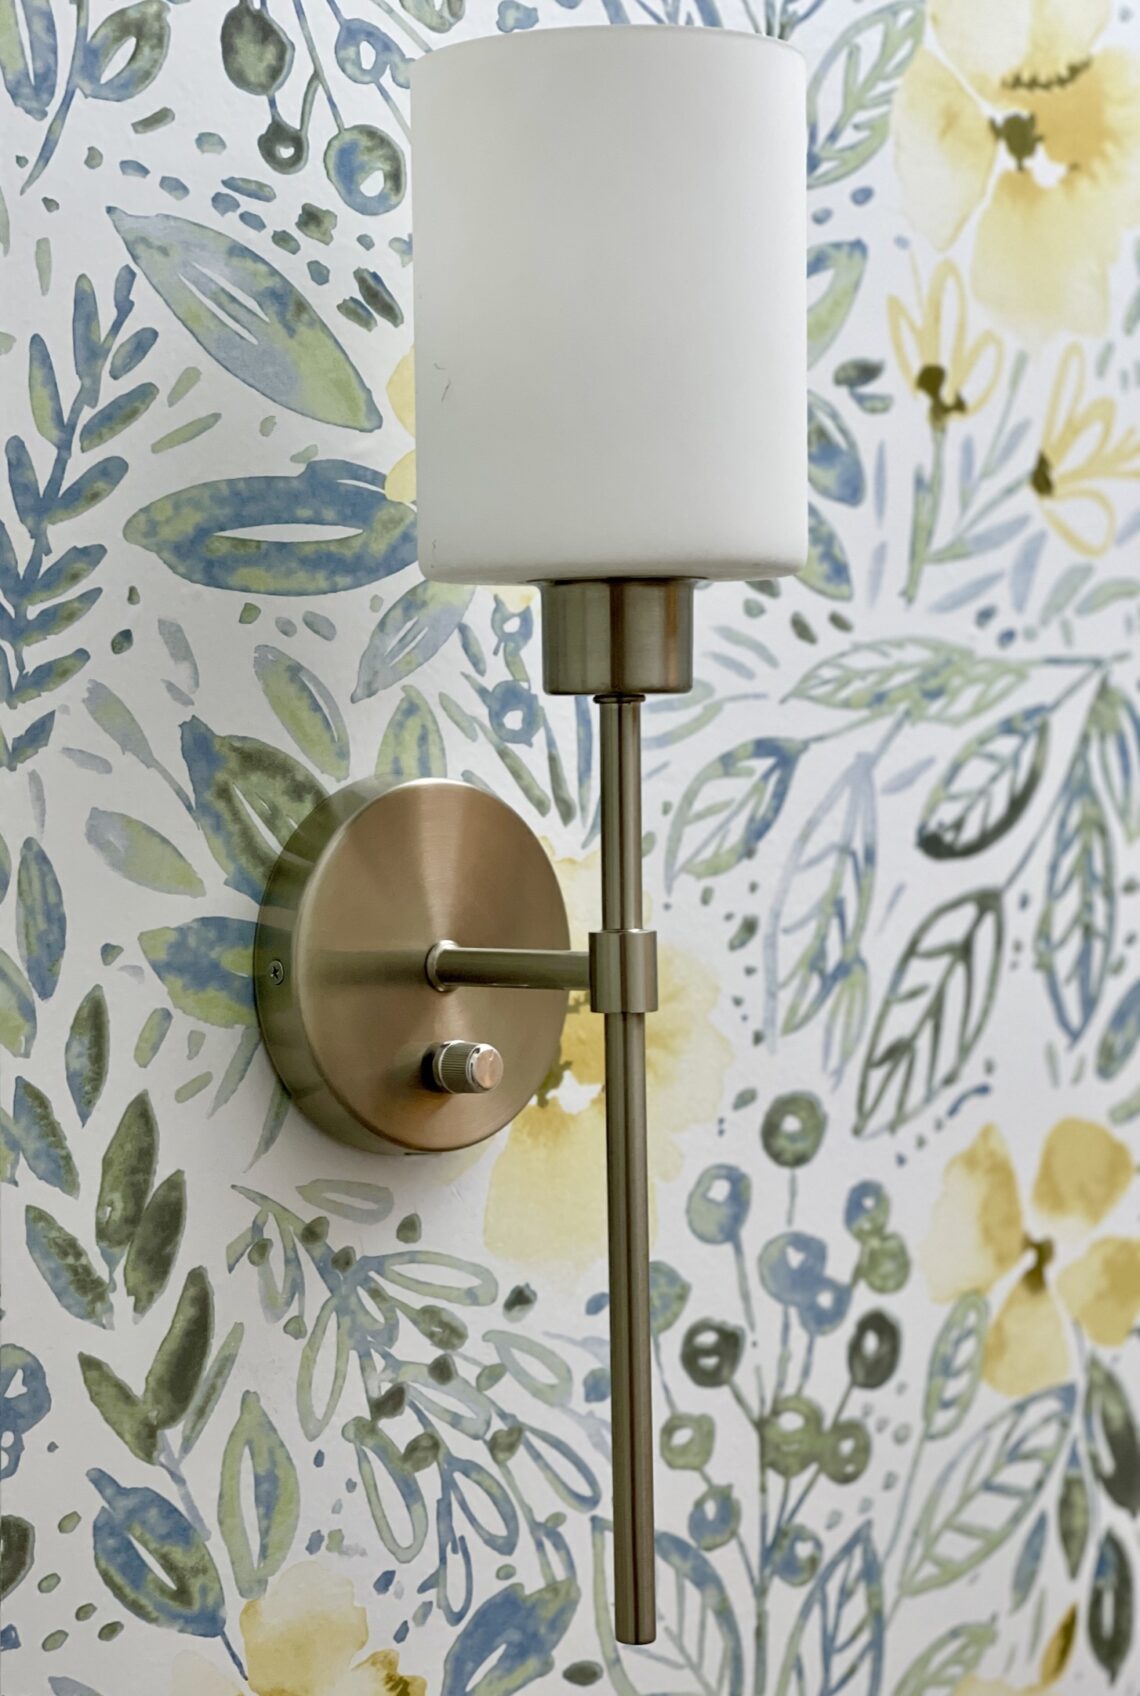
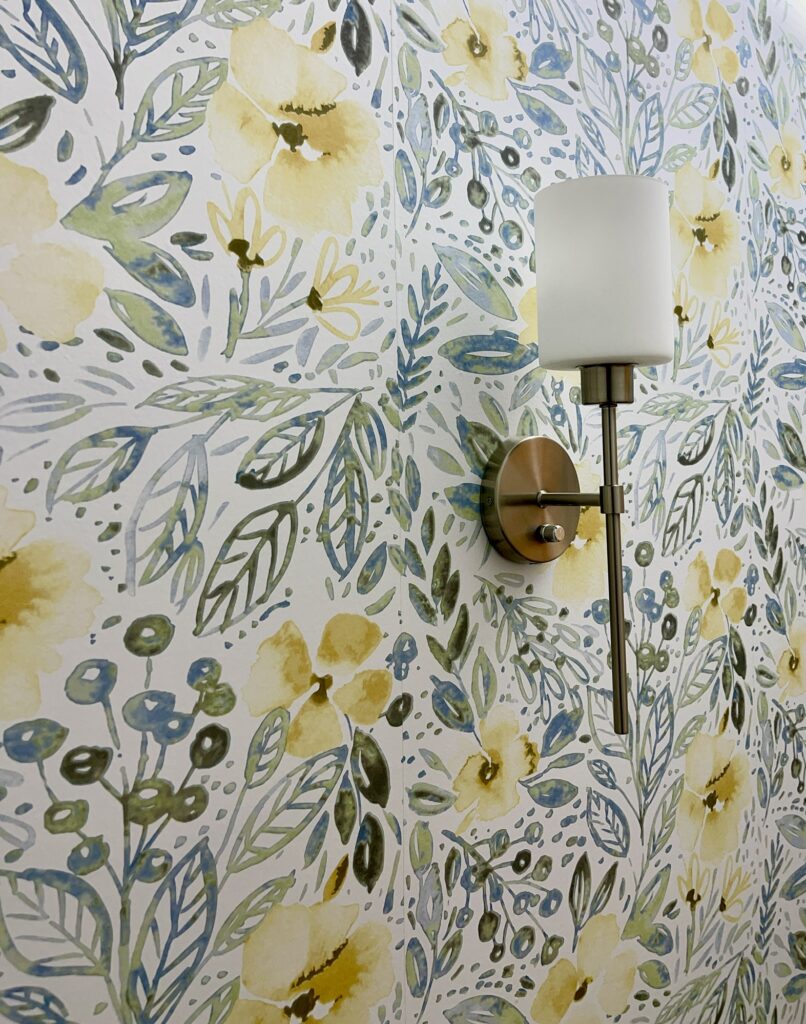
A white background with a bit of color will add a bit of whimsy and design on one wall behind the vanity.
Step 2: Measuring for Peel and Stick Wallpaper
There are great tools online to use for measuring. They work well!
You need to measure carefully to ensure that you have enough paper to keep your design repeats lining up and completely covering your walls. Purchase an additional roll of paper with large repeats to make sure you have enough.
The larger your repeat, the more wallpaper you will need.
If you order online, most companies will give you the formula and guidelines to make sure you are successful in measuring.
Basically, it will tell you to measure your walls -width x height- and then allow for your repeat to make sure you have enough rolls. There’s a formula that for this math challenged girl– simplifies the process!
It may benefit you to order or purchase wallpaper from a reputable place that allows returns if you purchase too much.
Step 3: Gather Supplies
Before beginning, make sure that you have all the tools ready to hang the peel and stick wallpaper.
- Peel and Stick Wallpaper
- Level
- Utility knife
- Measuring tape
- Pencil
- Straight edge
- Smoothing tool
Here are affiliate links to help you locate what I’ve used. Just click on the photos to shop at no additional cost. See my disclosure policy.

Step 3: Prepare the Walls
Before hanging the wallpaper, make sure that your wall is clean, primed and painted. Since our last update, we have primed and painted the walls for a better surface for the wallpaper.
Unlike regular pasted wallpaper, there is no need for prepping the wall other than a clean and painted surface.
Next, remove any outlet covers before beginning.
Since we were adding new baseboards and crown moulding, we chose to leave those off until we added the wallpaper which made it easier not having to cut as straight an edge at the top or bottom.
TIP: Either paint the walls that adjoin the paper or edge them with the paint color BEFORE wallpapering to make painting later easier.
Step 4: Hanging the Wallpaper
- Always begin at the top and in a corner of your room.
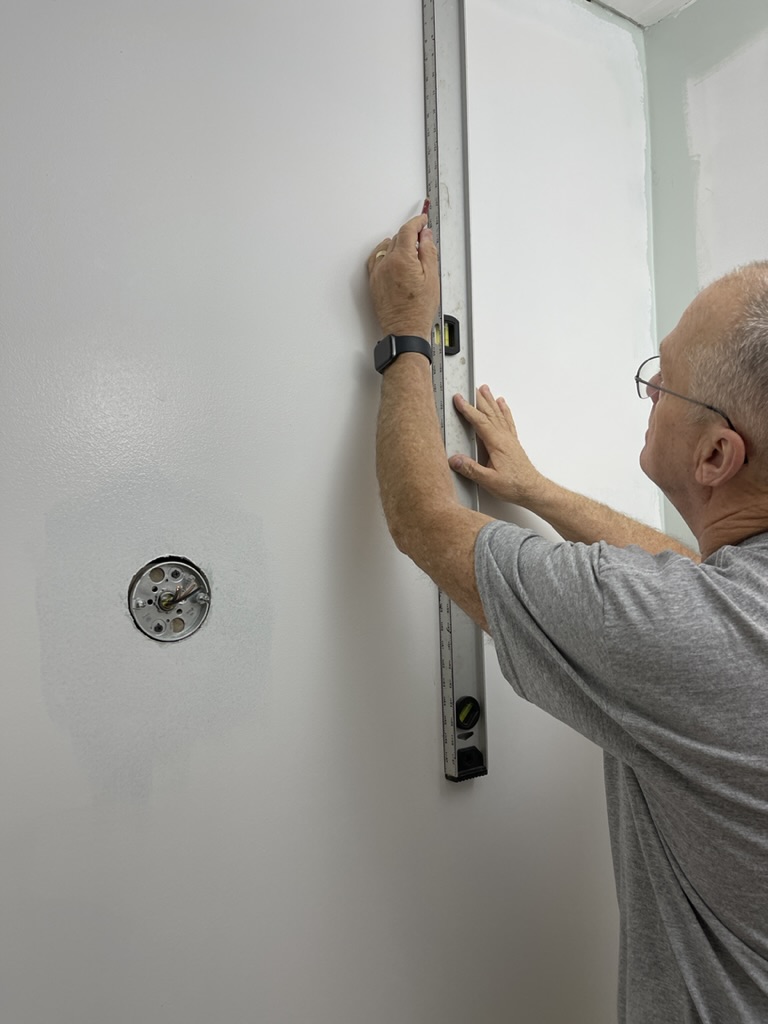
- Measure the width of your wallpaper. Then, use a level and a straight edge and make a line ensuring it’s straight all the way down. This will give you a guide to keep the paper straight as you hang the first piece. Some people use a plumb line, but that blue chalk is a bit much for me! We simply made a pencil line using the level to ensure the paper went onto the wall straight.
- If your walls aren’t straight, you will find out about now! Just make adjustments to keep that first piece straight before you hang it. Since we were only papering a feature wall, we actually took the paper a half inch around the corner to then cut it off after hanging it all. Works beautifully!
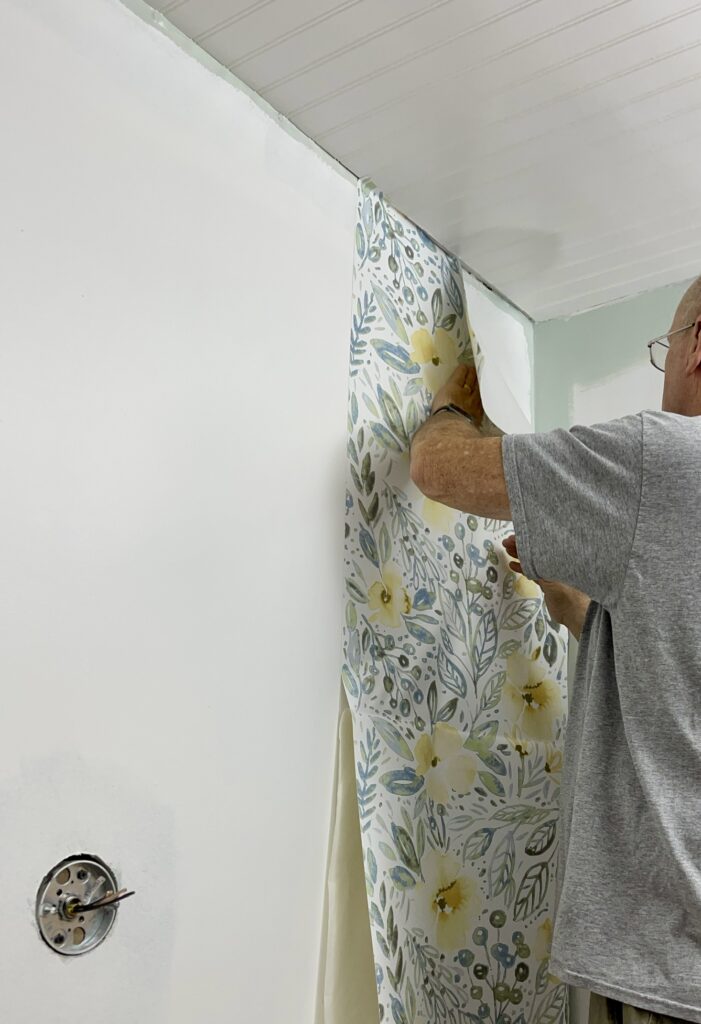
- To begin hanging the paper, allow at least an inch or more at the top of the wall so that you can cut it off where the ceiling and wall join. Press with a straight edge to make an indention before you begin peeling the corner and attaching to the wall.
- Begin at the ceiling and peel down about 10 inches and line your paper with the top and the line marked on the wall as you start to adhere it.
Take your time!
- SLOWLY start at the side and press out and down as you go, feeling with your hand, to make sure all the bubbles are out as you go. For this paper we just found out that using a straight edge created more problems. Smoothing with your hand just worked better.
- Take your time and move down the wall, smoothing, removing bubbles and adhering to the wall, making sure you watch the line to keep it straight.
- When you get to the bottom of the wall, use your straight edge to hold the wallpaper as you use the utility knife to cut off the wallpaper from the ceiling edge and baseboard edge.
Step 5: Repeats
As you hang the next wallpaper, make sure that you line the wallpaper up to match the repeats you see from the first row to make a seamless match on the wall. Continue until you complete all of the wallpaper lengths.
Look carefully at the edge of your paper and the directions for hanging to make sure that if there is a white edge on one side, that the paper covers that when it lines up with the next run of wallpaper.
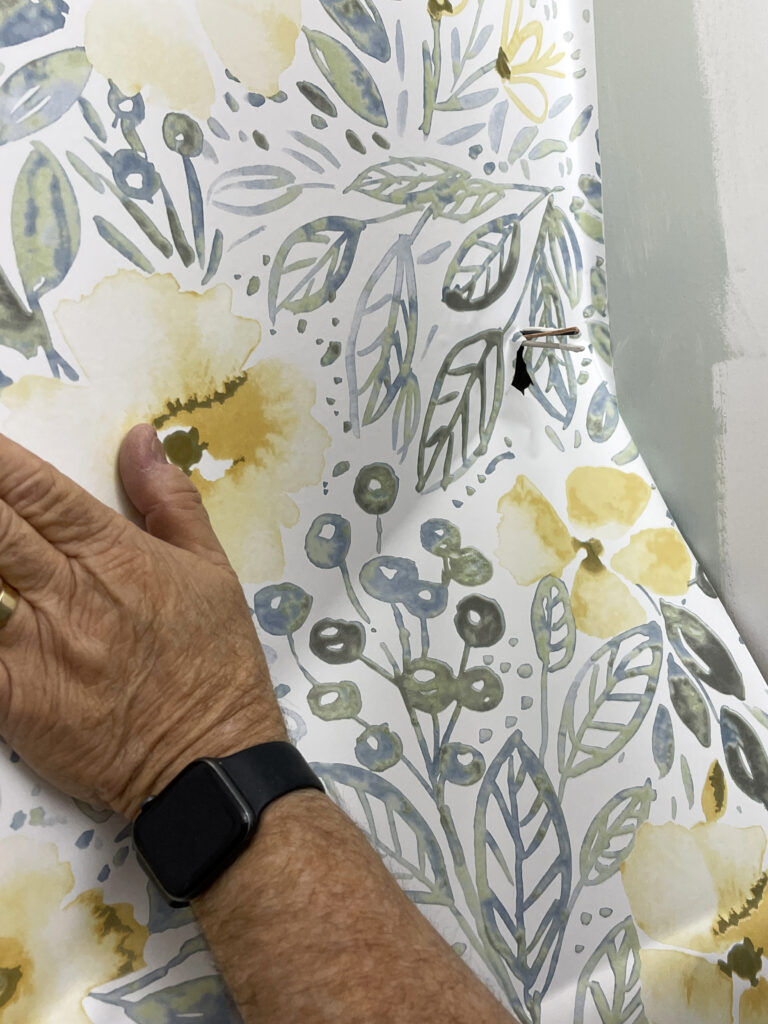
TIP:
When you get to an outlet, make a small X in the center and continue papering until you get finished. Go back and simply trim to the edge of the outlet box. The cover will finish it off perfectly.
There you have it! You now know how to hang wallpaper!
The lights even got hung! WOO HOO!
This week also found us rethinking the paint colors for the wall and ceiling. I had thought the ceiling would be the color and walls white to match the paper. However, the ceilings are so low in that bathroom that the reverse happened.
The color we selected was a Valspar from Lowe’s in a Joanna Gaines color, “Emmie’s Room”. It just gives the appearance of a watercolor that looks beautiful with the wallpaper.
We learned in the last bathroom makeover that semi gloss paint is recommended in bathrooms, so that’s the finish we chose again for this bathroom redo.
It’s like this bathroom keeps letting me know what IT wants…and what works!
What’s in this next week’s plan to get this One Room Challenge finished??
- The shiplap will be repainted that same white this week.
- The walls will be painted in that wonderful new color.
- A great crown molding will be added and painted this week.
- Finding the last accessories to now match the newer color scheme.
- Last, but not least, we hope to get flooring down.
WISH US LUCK!
You guys, I am sooooo in love with this peel and stick wallpaper. If you haven’t tried it…you need to!
Thanks for joining us on this week’s journey to get this project done!
Until next week,


11 Comments
Tracey+Buchanan
Love what you chose! So happy and pretty!
Linda Johnston
Leslie, this is going to be beautiful!
Leslie J Watkins
Thank you so much, Linda. I am loving the transformation!
Leslie J Watkins
Thank you. It is so different from anything I’ve ever chosen…but is making my heart so very happy!
Vickie Ramey
So pretty! I knew there would be a touch of yellow! Man, this challenge is really challenging you guys to get this bathroom finished–can’t wait to see it!
Leslie J Watkins
I know, right? I can’t wait til it’s finished!
Wendy McMonigle
What a great post Leslie, thanks for sharing all your tips.
Leslie J Watkins
Thank you, Wendy. Moving on to crown molding and flooring this week! Seeing light at the end of the tunnel!
Martha+Wallace
Looking great! I’ve never tried the peel and stick! Almost done!!!!
Leslie J Watkins
It’s almost ready for the reveal! Loving it!
Pingback: