
It’s Time to Add Life Back into the Porch!
Do you have a clue how long I have been waiting to say that? One of my favorite places in my home is the screened in back porch. It’s really where my inspiration for writing this blog began. Sitting, journaling, writing, having coffee or sharing a meal. Spring has arrived and it’s time to add some garden and life to that screened in back porch with a new wreath.
I’m ready! Are you?
Today, I decided it was time that I created a wreath for that porch that added a bit of gardening and entertaining into the mix. I am a part of a blogging group and our challenge this month was for creating a wreath. So, this one was easy!
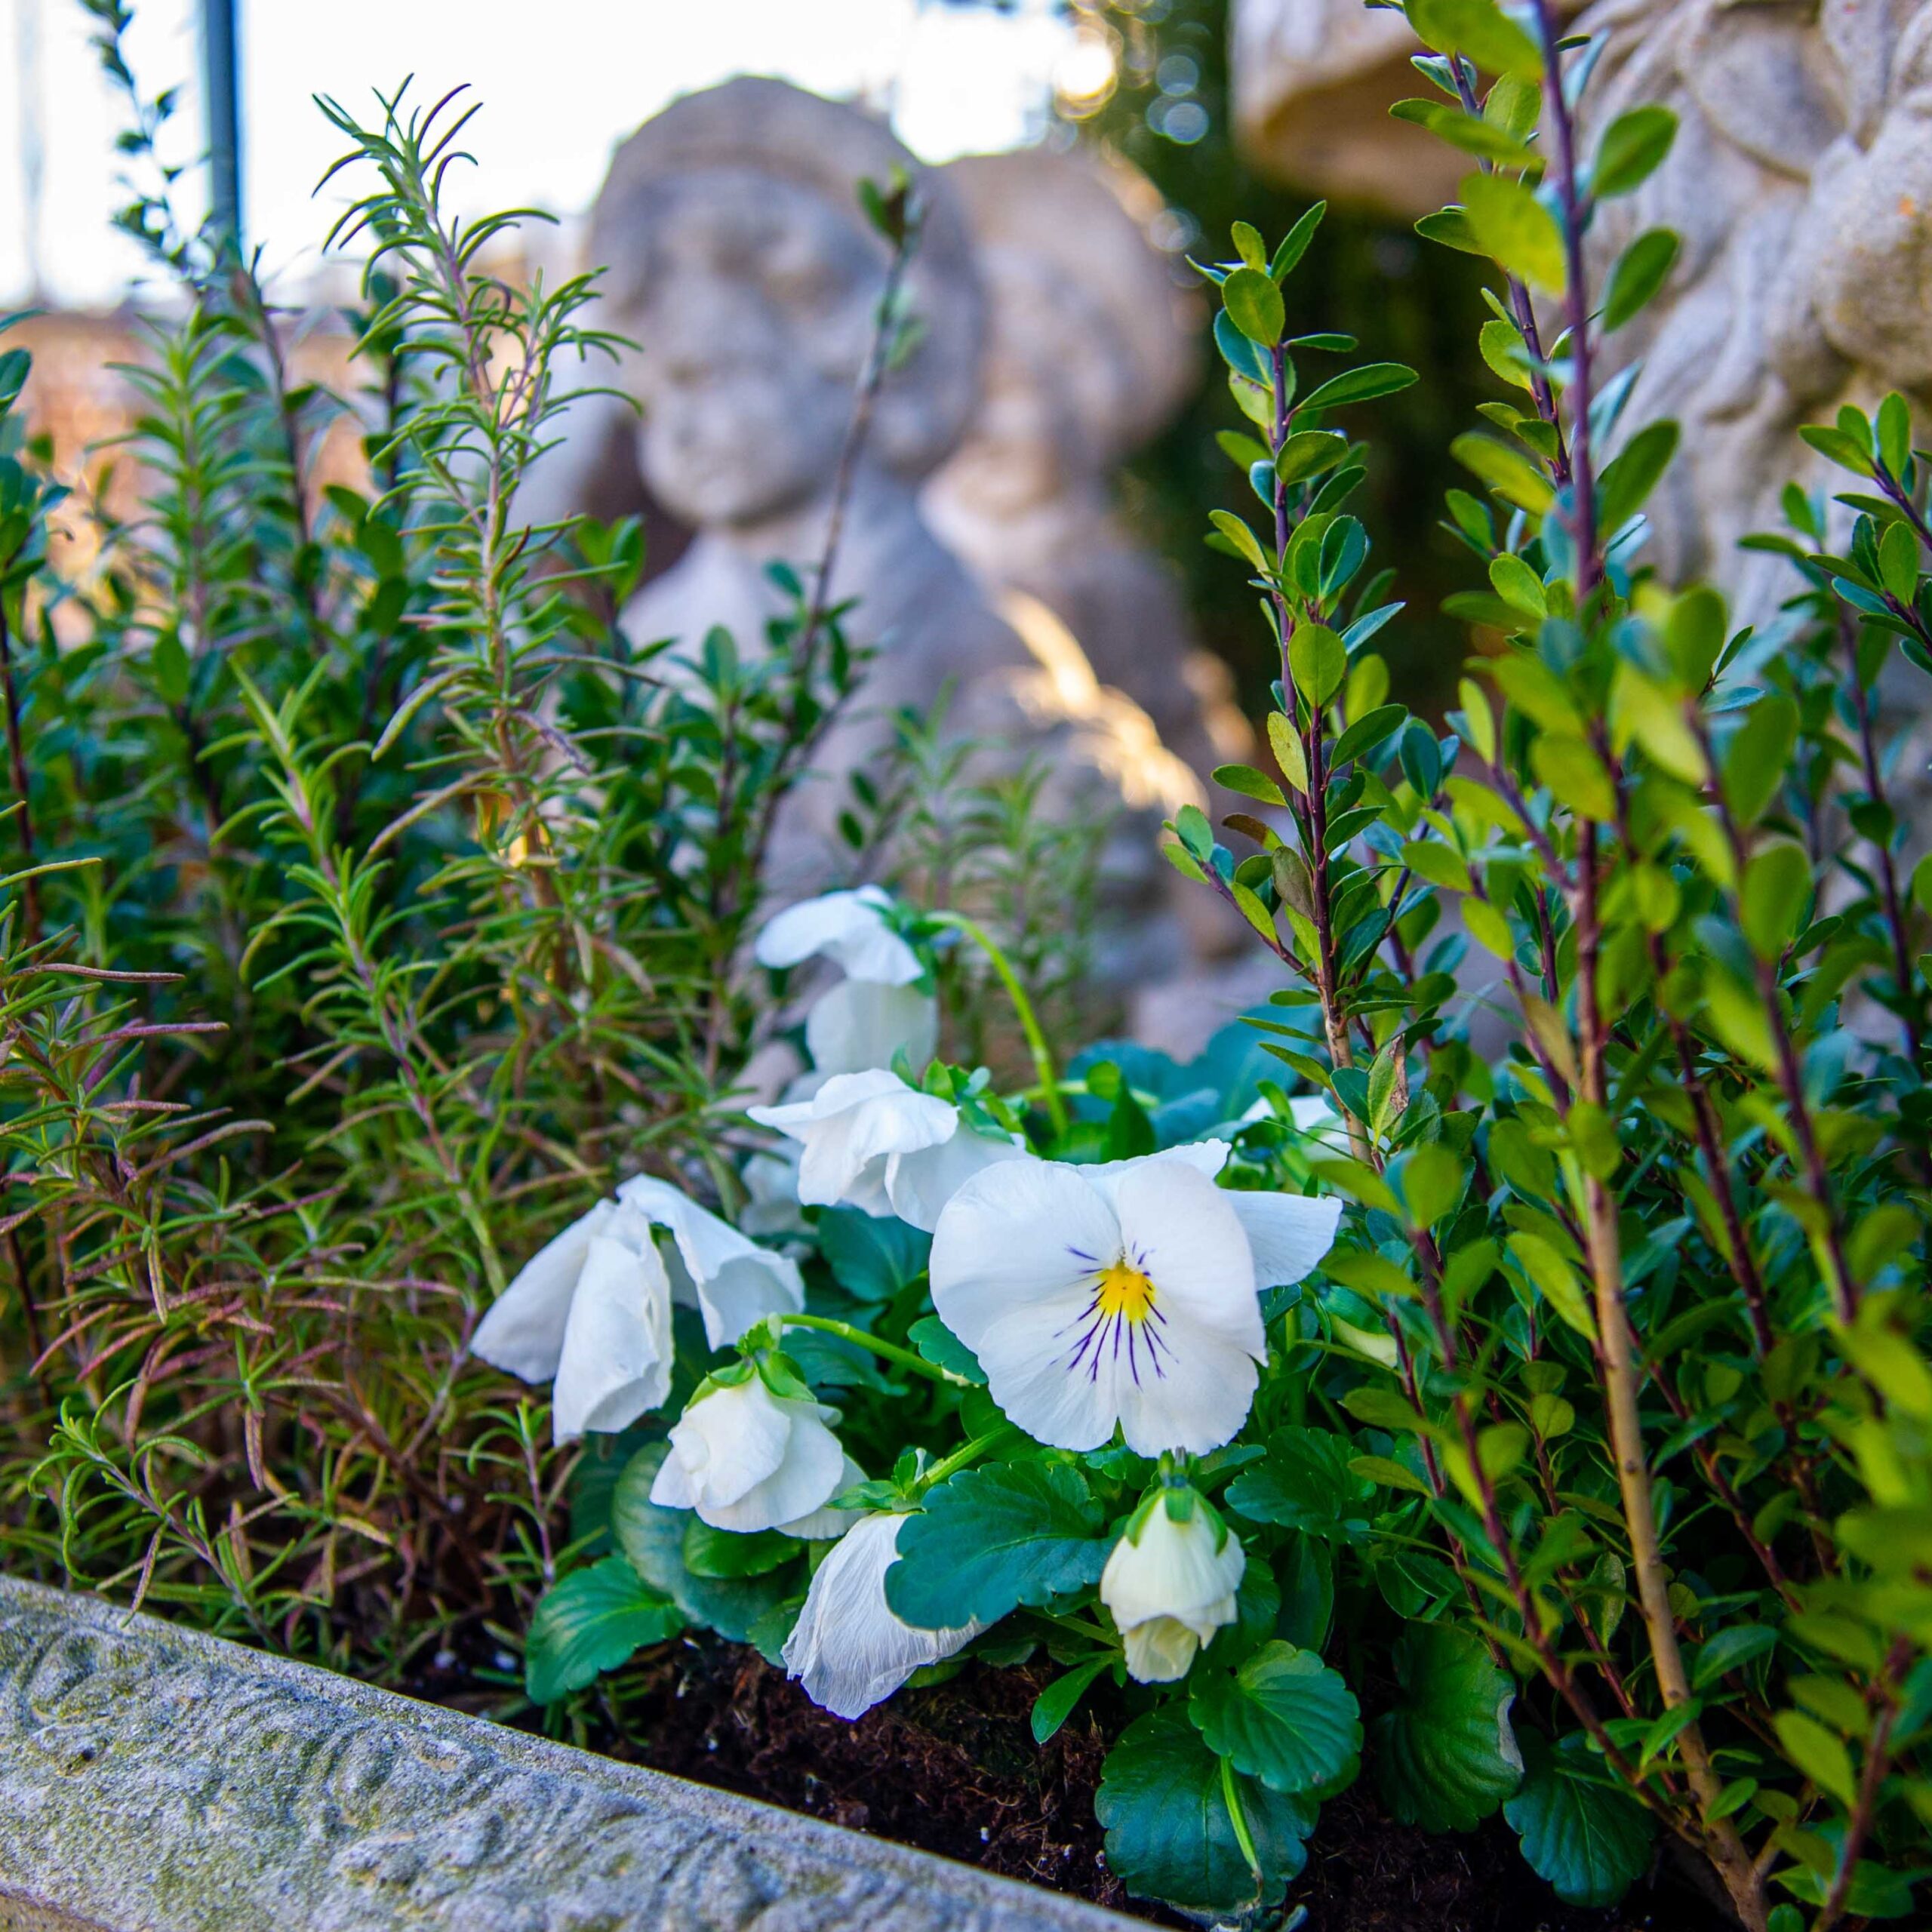
My screened in porch needed a new wardrobe and spring update.
Now there’s another another favorite shop– Lamon’s Antiques that always inspires me and has provided me with lots of great finds that decorate my home.
When I walked in for the first time after the really long year we have had, there was an amazing wreath. It hung in the entrance to catch everyone’s attention.
A Christmas wreath that had been gained new life for the seasons hanging there in the entrance of that shop.
It held blue and white china plates and cups and creamers and recently she had added spring touches with forsythia. It was gorgeous.
Inspiration struck. Again.
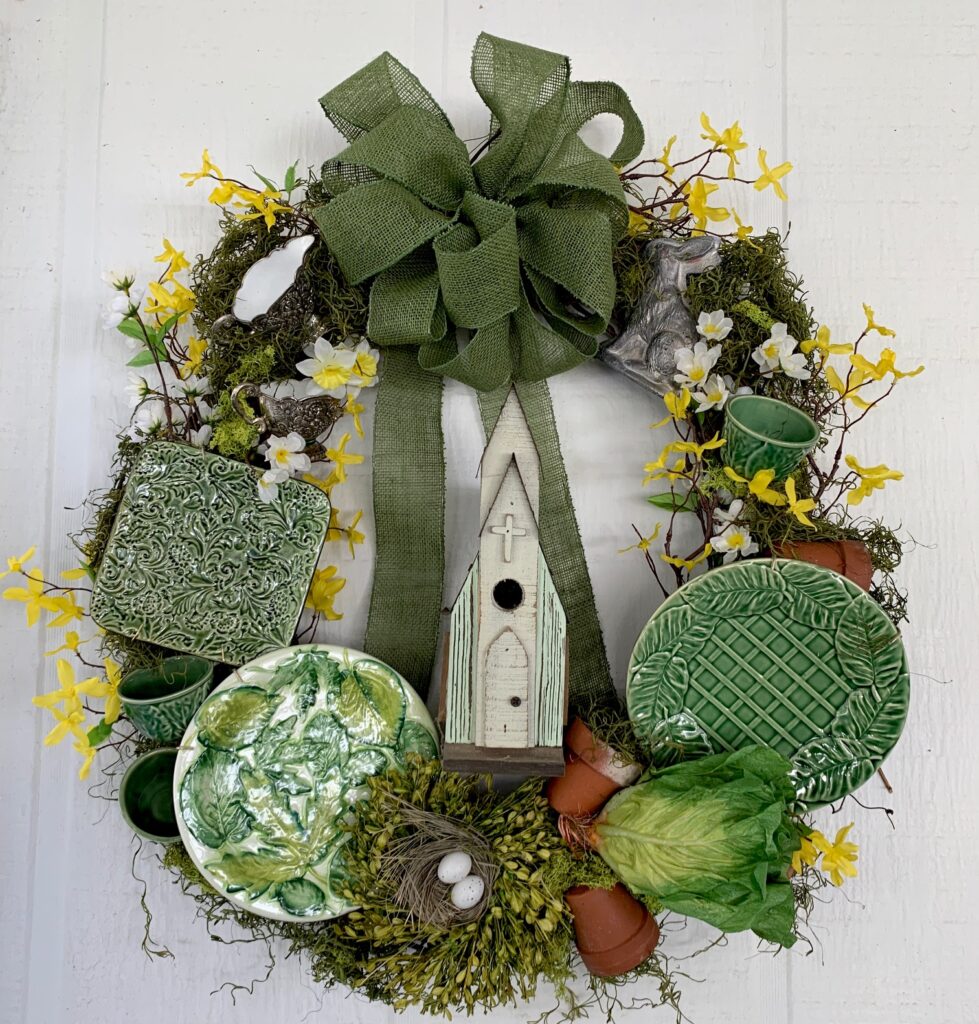
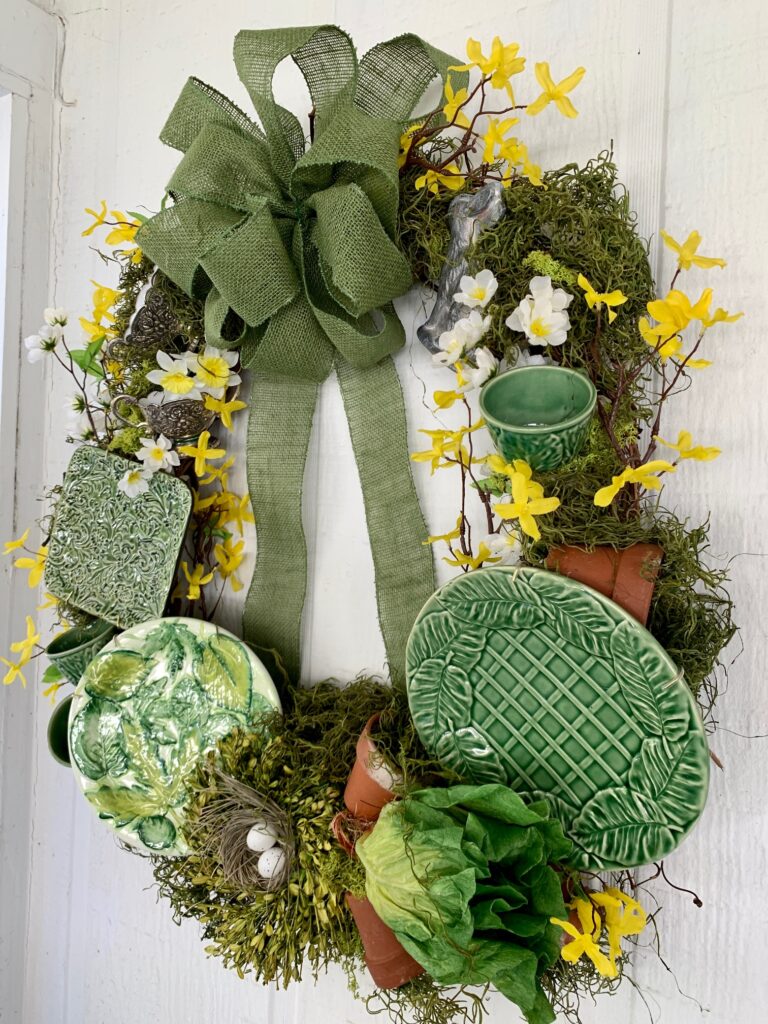
Now, if you have followed me very long, you know that gardening is one of my favorite things to do. There were green antique plates and cups among the shelves at that shop, and home they went with me to create my own version of that wreath to add life and a garden theme the porch.
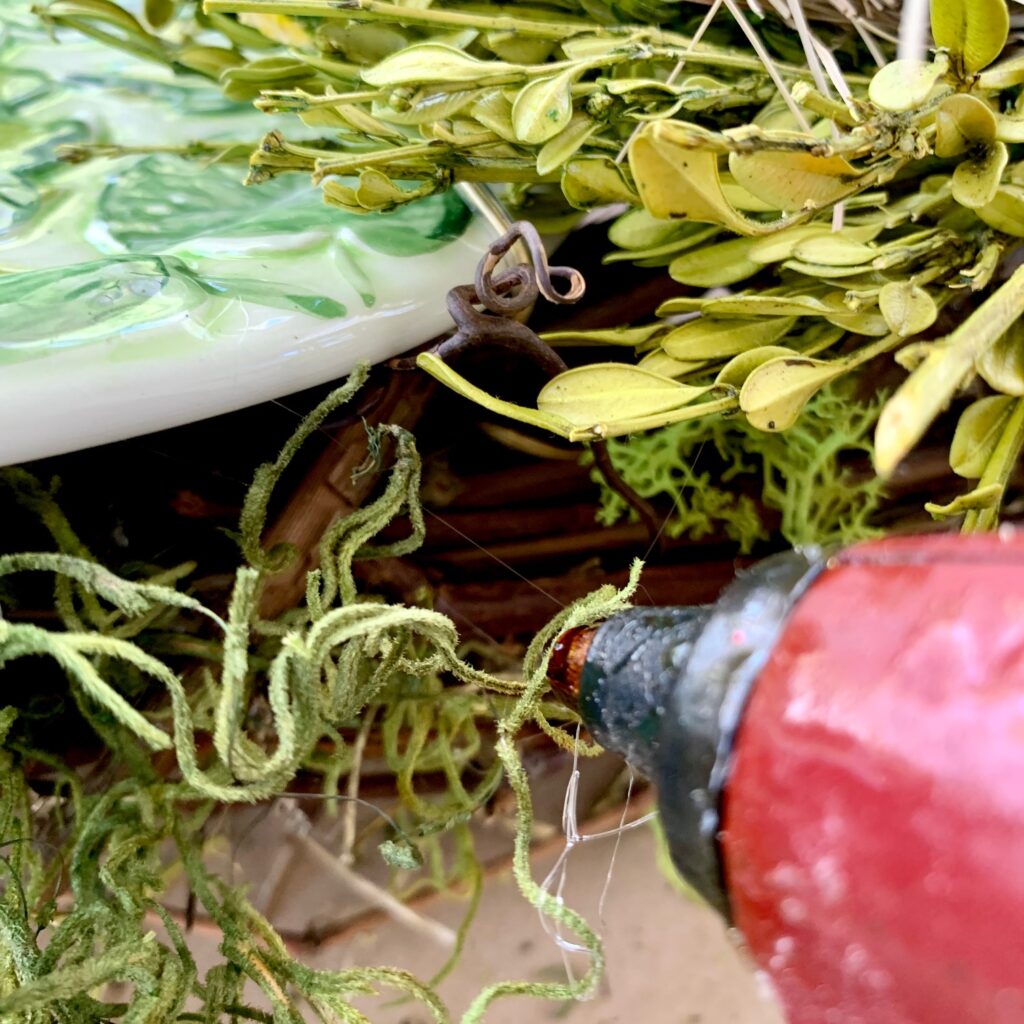
Off I went! Supplies from the spring bins. Grapevine wreath. Wire. Plate holders. Dishes selected. Hot glue gun ready. I was all in!
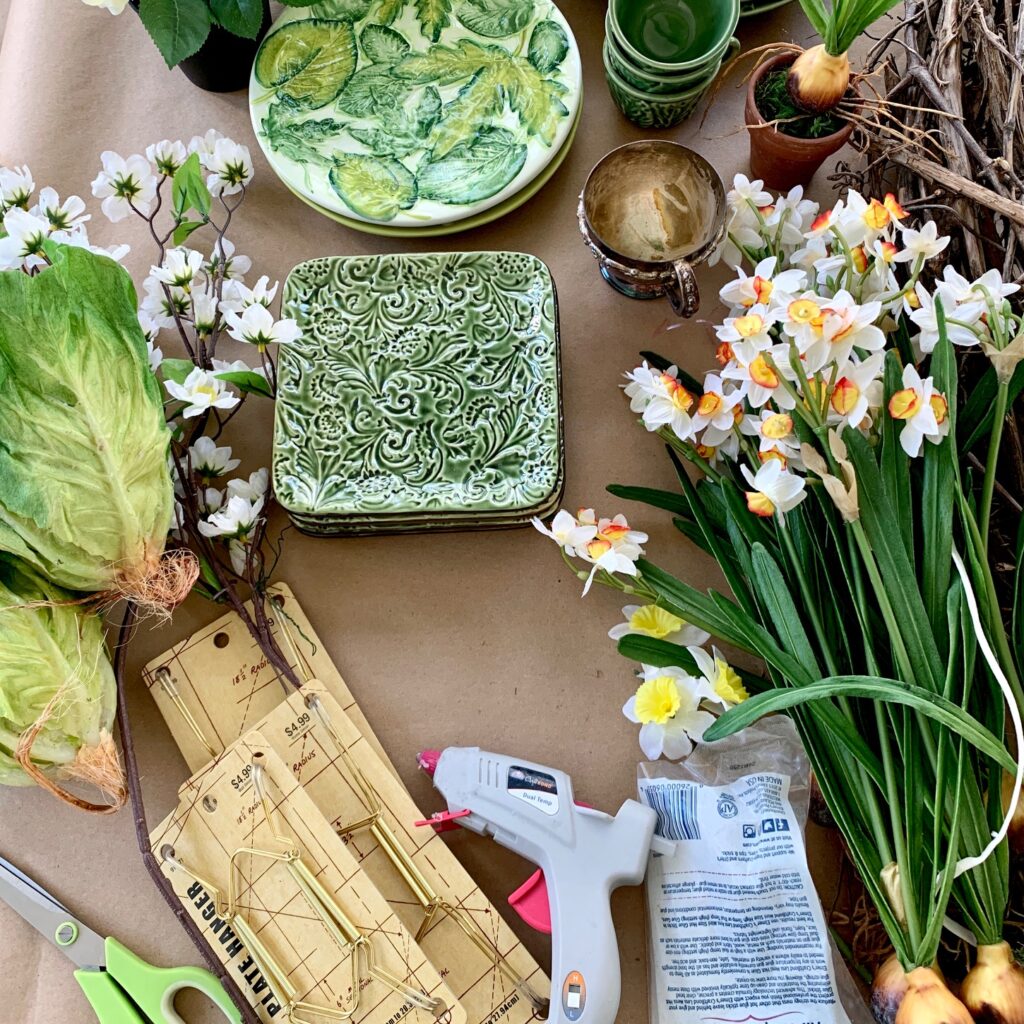
The porch table was covered and supplies were gathered and laid out that I thought I might use for the project.
Spring foliage, silks, dishes, hangers, scissors, ribbon, glue gun and sticks, wire cutters, and moss were some of the items that I pulled out to create that garden inspired wreath.
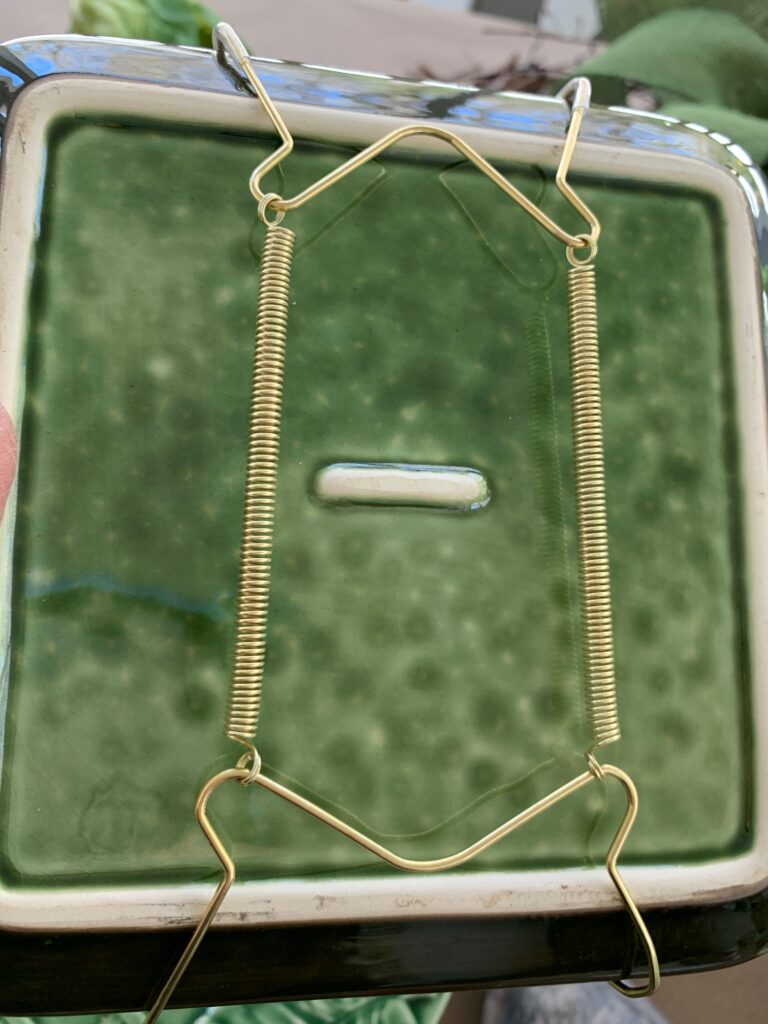
The first thing I did was add plate hangers to the backs of all of the plates to be able to wire them onto the wreath.
You’ll see as I progress how my creative mind changes!
As you can see, not all the supplies that I laid out were used.
They just didn’t make the cut this time, so back into bins they went to await the next project.
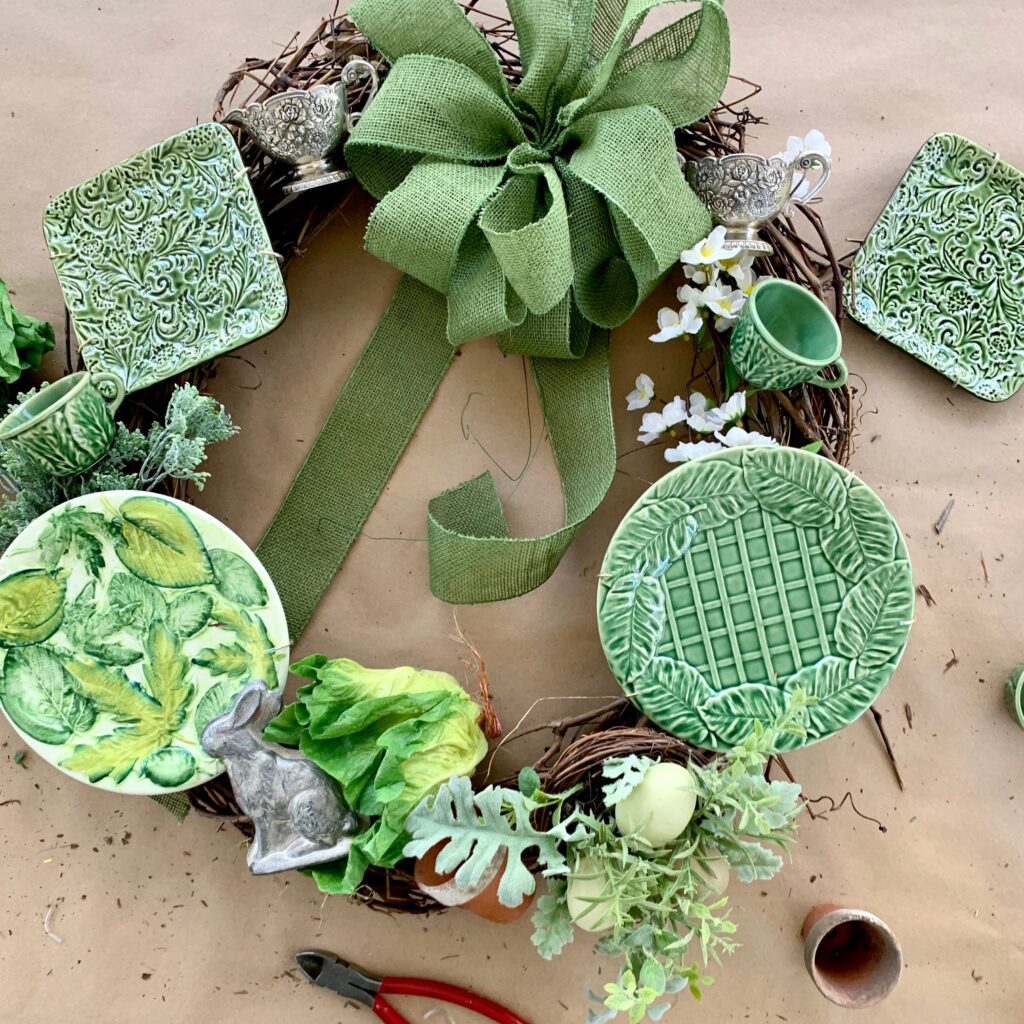
A very large wreath was downsized to a smaller oval one as I began to lay everything out.
Wire was run through the clay pots, moved and removed until I had a visual of what I wanted the wreath to look like.
I selected a green ribbon that fit well with the garden wreath theme, made the bow and attached it with wire at the top.
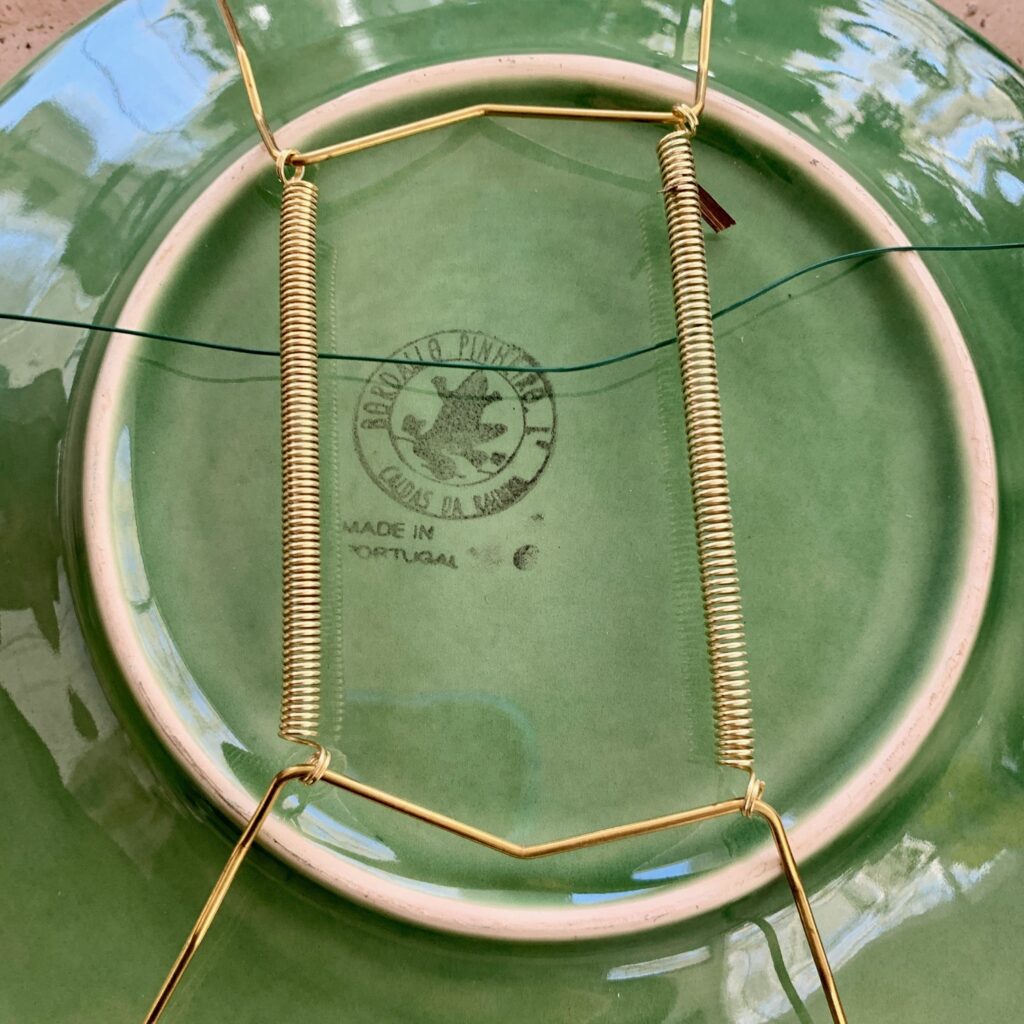
Floral wire was run under the plate hanger on the back of each plate on both ends, to ensure that they held and were able to be placed where I wanted them attached on the wreath.
I then added them into position on the wreath. I used antique green plates for my wreath; but, feel free to select plates that suit your setting, if even melamine!
Plate Wreath
Equipment
- Glue gun, wire cutters
Materials
- 1 wreath form I chose grapevine
- salad or dinner plates
- serving pieces creamer, cups, pitchers
- floral wire
- glue gun and glue sticks
- silk flowers
- clay pots
- wire plate holders
- moss
- ribbon
Instructions
- Add wire plate holders to plates that you want to add to the wreath.
- Lay your wreath form on a flat surface and begin grouping things until you get the desired look.
- Add plates, cups, garden tools, clay pots, in the area you want them to be showcased.
- Attach each firmly with a long piece of wire attached to the form.
- Fill in behind and around each piece with your favorite greenery or flowers or moss until you have the effect you are looking for. I used a glue gun to add those.
- Add ribbon if you prefer to achieve your desired look.
- Attach a hook of looped wire through the back of the wreath to hang.
Notes
The glue gun attached the nest, silk flowers and moss as the creation began to take shape. I always love to decorate with wreaths. I kept tucking in and taking out and adding…even with the finished wreath.
In went a watering can.
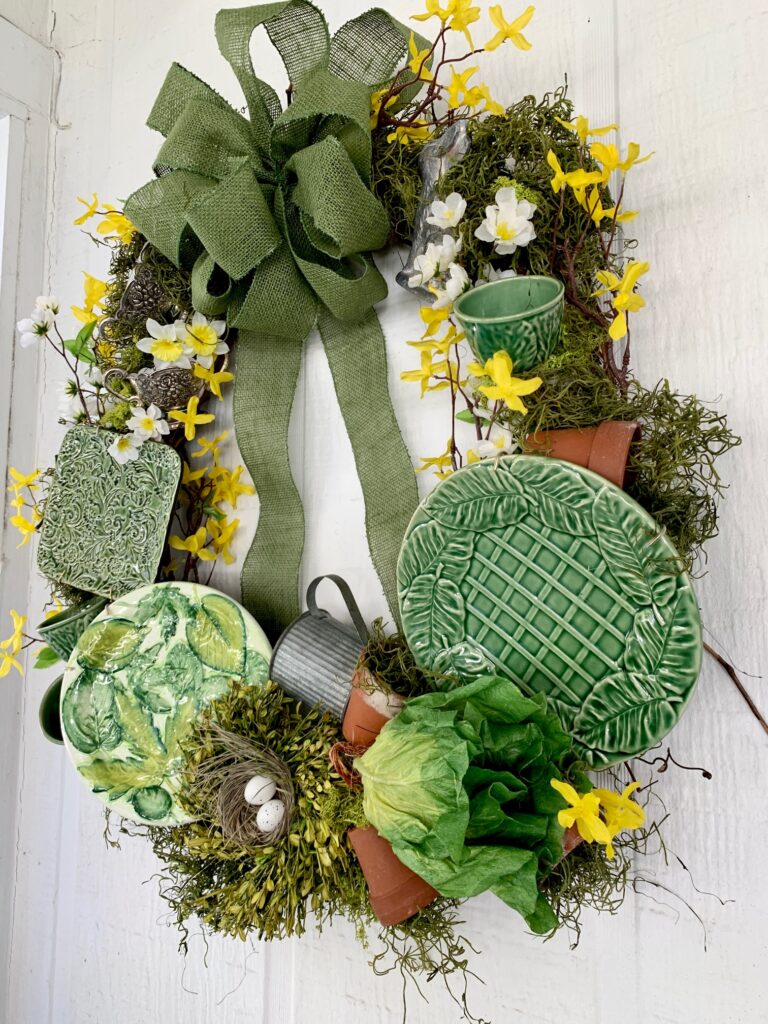
Back out it came! A few more bits of moss. Some more forsythia added in.
In went a church birdhouse…but it was a bit too unsteady on it’s perch. So out it came!
Are you like that?
When I am creating wreaths or floral work I have a plan. But, as it progresses, often it takes on a look of it’s own. It becomes it’s own creation.
That happened today. Who knows? By tomorrow? It may have new finds tucked in! It evolves as the spring moves into summer.
The birds were chirping. Sunshine streaming in through the screened porch. A light breeze with still a bit of chill; but, on I played and created and glued and wired and attached.
Tip: Although this wreath will be inside, I always attach a nest with eggs if hanging a wreath on the outside door. It sends birds a message that the “someone” else has already made there home there.
There’s nothing worse than a bird building a nest and laying eggs on your front door decoration.
I don’t know about you, but I want Mama birds to make nests somewhere else besides my doors.
A Mama bird flying inside when that door is opened is not good for Mama OR my safety. No one needs a Mama bird protecting her little ones and attacking OR abandoning her nest when too many are around.
I hope that you are creating works of art and door decorations and wreaths for your own home.
Now that the garden wreath is complete, I’ll be working on so many new things to be added to that porch!
More life and plants and new garden touches to it.
But, most importantly? I can’t wait for feet to be under that table for a meal and conversation!
How about you?
As an Amazon affiliate, I’m attaching a few of the things that you might use to create your own garden plate wreath.
The blog may earn a small commission for items that you purchase, but will be at no extra cost to you. I love that I can shop for you…find things for you at your finger tips. Hope you love it, too!
I hope you’ll follow the rest of my friends to see their wreaths! Enjoy!
Click on the link below:

71 Comments
Vickie Ramey
Beautiful, as usual!
Leslie J Watkins
Thank you. More garden touches coming!
Karins Kottage
How fabulous is your wreath!! Such a creative and fun idea to use plates, mug, birdhouse and nest! It says spring!!
I too have birds nesting on my front porch! The poop is driving me crazy! Here is my bird story- when we lived in Texas there were some mean birds that would dive bomb us! One time one was in the garage and I couldn’t get into my car! I decided to make a run for it… I ran with my key to unlock the door… just as I get to the car… here he comes… I look up and say nooooo…. he pooped and it landed it my mouth!!!! Unbelievable!! I can laugh about it now!
Hugs,
Karin
Leslie J Watkins
Oh, no, Karin! Not in your mouth!! Goodness! We went to the beach one year and as my husband just stretched out on the sand, a sea gull dropped his contents all over my husband’s face and in the mouth! An unforgettable memory for you, too, I am sure! I am wanting to open my front porch up with beams and I have debated whether that open area and beams might be an invitation for new places for birds to nest and “dive bomb” from there, as well! I can’t wait to finish the back porch with touches of the garden and let it evolve into summer through the next months! Happy Easter!!
Chris wooley
Really pretty Leslie
Leslie J Watkins
Thank you, Chris!
elizabeth@pineconesandacorns
I love this wreath and the tutorial! I am going to have to make a wreath with plates on it! As for the birds, two years ago I oped the front door for the Fed-ex man and a bird that was sitting on our wreath flew into the house. My husband was out of town, it was 37 degrees and for the next 3 hours it was a circus. Our foyer in the front is 2 stories and at the back of the house we have a two story family room, my two pups were running all over the house chasing the bird, I had all of the doors and windows open and was throwing dog toys near the bird everytime it landed on something to shoo it out the door. I am sad to report that after all that time I opened the stops to the attick and he flew upstairs. When my husband arrived home the next day I made him go up to look for the bird and we could not find him. I am hoping that he flew out thru one of the air vents or the attic fan.
Thank you for sharing this beautiful wreath Leslie.
Leslie J Watkins
Oh, my goodness, Elizabeth! Although I know it wasn’t funny at the time…I was laughing soooo hard reading your bird story! I have lived through so many bird fly ins that I totally felt all that you went through! Give the nest with eggs a try. It has worked for me every time. You are always the BEST encourager. Thank you, so much, friend.
Dorothy Ensz
This is the best. Love your innovative imagination!
Leslie J Watkins
Thank you. Creating florals are always a favorite!
Tammy
Leslie, this is a stunning wreath. I love sll of the elements and the moss that you incorporated into this project. What a wonderful tip about the bird nest. I always have birds picking a part my wreath on the door. I am going to try adding a bird nest with eggs.
Leslie J Watkins
So glad you like it, friend! That nest trick has worked for me. I had so many birds nesting and flying in with front doors that maybe weren’t used as often. It was scary for both of us!
Regina @Saved From Salvage
I love this and the colors! So creative and unique. Screened rooms are the best aren’t they? I’ve turned my sunroom into a garden jungle, wintering some plants from outdoors. Can’t wait for it to warm up and hit the garden. So enjoyed the tutorial but moreso your writing!
Leslie J Watkins
Thank you, Regina! I’m inspired to redo that porch with garden touches throughout! Can’t wait until there are more feet under that table there.
Jennifer Williams
I love the colors you used! So stunning. I always end up with a nest on my front door baskets. I’ve never even thought about putting a nest and eggs in there to say “taken”. Brilliant l!
Leslie J Watkins
Thank you, Jennifer! Yes. I learned that nest and eggs years ago and has saved birds flying inside since!
Brooke
You had me at Plate Wreath. I just love all your additions. This will be perfect for your back porch. Great job and so inspiring.
Leslie J Watkins
Thank you, Brooke! If I can’t have a gorgeous greenhouse like you have created, I’ll add some gardening touches to the entertaining areas on my screened porch. Thank you for your sweet comments! Happy Easter, friend!
Jayne
Leslie, I adore your spring wreath! What a great idea to use plates – when I first saw the wreath I thought, “How on earth did she get them to stay on”, now I know your secret – very clever! By the way, thanks for the tip about adding the nest on the wreath, I’ve never thought about that before – now I’m thankful I added some eggs to my wreath too! (even more so, after reading Karin’s comment!) 🙂
Leslie J Watkins
Thank you, Jayne. I am in love with the garden tone for my porch and can’t wait to make that room one that speaks garden each time I entertain there. And, YES! bird nests and eggs always save the day here! Glad I could help! Happy Easter!
Marie
What a great way to display cups and plates. I would never think about birds trying to nest in a wreath! Yikes! Good tip on preventing that.
Leslie J Watkins
Thank you, Marie. I had such a great time with creating this one. And that nest tip has saved me with the bird nest building and babies nesting on my wreath! Happy Easter!
Kim Waldorf
This is just beautiful, Leslie! What a great idea. Definitely wants to make me try one. I love the church you put in the center. Well done, friend!! I love it!
Leslie J Watkins
Thank you, Kim. It will definitely evolve from spring into summer with the addition of things from the season…out with the forsythia and probably in with geraniums. Happy Easter!
Marieza
Leslie, I am blown away! This is so creative and absolutely stunning.
Leslie J Watkins
Oh, thank you, Marieza! I had such a great time creating it and am loving adding more garden touches to entertaining on the screened in porch. Happy Easter, friend!
Paula@SweetPea
Your wreath is gorgeous! I never have thought of putting plates on a wreath and I love the end result.
Leslie J Watkins
Thank you, Paula. I was hooked from the moment I saw the one. It was sooooo easy to make and I love the end result. It’s gotten my creativity flowing for continuing that theme on the back porch. Have a wonderful Easter, friend!
Linda Johnston
beautiful wreath! love how you used the china.
Leslie J Watkins
Thank you, Linda. It was a fun one to create and inspiring a redo for that porch!
Libbie@alifeunfolding
Leslie,
Your wreath is just darling!!!
Leslie J Watkins
Thank you, Libbie. It makes my heart happy to add a bit of gardening and entertaining into the porch. Happy Easer!
Renae
Your wreath looks amazing! I love all of the green plates-they are gorgeous. I really like the little chapel on the wreath, it looked so cute. You are so talented.
Hugs and blessings to you.
Leslie J Watkins
Thank you, Renae. Aren’t they the most fun plates? You are too kind. It just made my heart happy to add a bit of Southern charm and garden to that wreath. Happy Easter, friend!
Sydney
I would have never thought to add dinnerwear to a wreath, but here you go making it look AMAZING! Beautiful as always Leslie!
Leslie J Watkins
Thank you, Sydney. I had so much fun making this one. Just made my heart happy. Happy Easter, friend!
Juliet
Leslie, this is the most fabulous wreath I’ve ever seen! Plates in a wreath … brilliant! I’ve sent your post to several crafty freinds … I know they’re going to go wild for it! xo
Leslie J Watkins
How sweet, Juliet. It made my heart so happy to put these together. Isn’t it fun? Thank you for sharing it! I’m a tiny, new blogger, so any sharing always is a win! Happy Easter!
Danielle
What a beautiful and elaborate wreath! I love that you incorporated dishes! This is so much fun!
Leslie J Watkins
Isn’t it fun? I loved putting this one together. I know I’ll keep adding things for the season changes to this one. Happy Easter!
Carol Karl
What an original idea. I love what you’ve done here.
Leslie J Watkins
Thank you, Carol. It’s one of my favorite places when the weather allows. Happy Easter!
Stacey
This is so beautiful. I love the spring time vibes! It’s so fun to decorate for the changing season, I LOVE this idea. <3
Leslie J Watkins
Thank you, Stacey. I just can’t get enough of that porch when the weather allows. Happy Easter, friend! Your quiches are on my menu!
Debbie Cate
I love the tip of putting a bird’s nest and eggs in the door wreath! I have had birds build nest on my porch the last 2 years. Great idea!
Leslie J Watkins
I know! It’s a genius idea that has worked beautifully for me. Saves mamas, babies, and humans! Thanks for following along with me, Debbie! I miss you!
Jenna
I love this!! So clever how you used plate hangers to attach those pretty plates, and I love the pots and the church in the center, so pretty and full of Spring!
Leslie J Watkins
Thank you! I loved making that wreath. So perfect for my screened porch.
Stacy
This wreath is adorable! What a cute idea!
Leslie J Watkins
Thank you, Stacy. That wreath will soon be evolving to add summer flowers…I just can’t ever leave them alone!
Pingback:
Pingback:
Leslie J Watkins
Thank you so much for sharing this on your post!
Rebecca
I love this wreath, Leslie! The plates make it so unique! Thanks for sharing at Celebrate Your Story! Link Party. You’ve been featured this week
Leslie J Watkins
Thank you, Rebecca! I am just now realizing that I can click back on your post share to comment! Please forgive this newbie and the lateness of responding! I am soooo grateful and thankful for your share!
Cindy@CountyRoad407
This is a truly amazing wreath! It’s such a cute idea and you make it look easy. Thank you for sharing it on the Farmhouse Friday LP! I’m so excited to try it. Pinned 🙂
Leslie J Watkins
Thank you. I loved creating it! So much fun and I love it on that screened porch!
Claudia Smith
Love this wreath!! You are so talented dear friend!!!
Leslie J Watkins
Awwww…thank you, Claudia. It was so much fun to make!
Debbie-Dabble
Love the wreath!! Thanks so much for sharing!!
Hugs,
Debbie
Leslie J Watkins
Thank you! It was so fun creating it! Changing out the flowers with the seasons which is perfect with those green plates…thank you for joining me!
Pingback:
Leslie J Watkins
Thank you for including me on this post! I am so truly touched!!
Cindy Rust
This wreath speaks to my vintage/diy lovin’ heart!! The head of lettuce is especially cute. I also enjoyed the bird stories your commenters told! I’ve certainly had that yuckiness plop down on my head but thankfully never in my mouth! Agh!! Pinning this project for sure!
Leslie J Watkins
Thank you! I’m adding new flowers and touches as we move into summer! I love my birds, but, goodness they need to stay away from the wreaths! Thanks for pinning, friend!
Pingback:
Leslie J Watkins
Thank you sooo much for the share!! So humbled and grateful!
Pingback:
Pingback:
Pingback:
Pingback: