
How to Pressure Can Green Beans
Do you love fresh green beans in the summer and wish you could have them during the winter months? It truly is a simple process to pressure can green beans. Many of you may freak out with the term “pressure can”…I get it…but by following simply rules there truly is nothing easier.
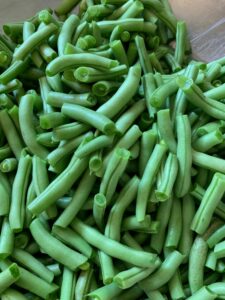
First, begin with the freshest of green beans. Locally grown at a farm or farmer’s market are my favorite. When I first began canning green beans there were local you pick farms. They are not to be found here any longer. Oh, how I miss those days of knowing I picked them and put them up immediately.
Here in Kentucky, those green beans begin to be ready for picking the end of June. Check in your area when yours are ready to be picked and canned.
Last year a friend who was finished with picking in her garden put on Facebook that green beans were free for the picking. 5 gallon buckets later…I rescued them and added them to my pantry.

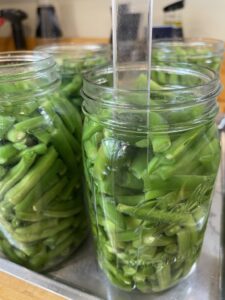
Simply snap ends and into about 2″ pieces and then rinse with cold water to prepare them for the canner. Aren’t they beautiful?
Do I have to pressure can green beans?
Yes, if you want to add canned green beans to your pantry. They are one of the vegetables that require a pressure canner to can properly and safely.
What are some tips for me to follow to pressure can green beans?
First, understand how your pressure canner works. READ THE BOOK. If you don’t have a book that came with the pressure canner, simply go online to find one that went with that canner when purchased.
Can I be honest with you? I have used old canners that were gifted to me without the book and because of that…I learned the hard way what NOT to do.
Here are some tips that I have learned along the way about pressure canning:
TIP 1:
You can’t use your canner outside to can on an outdoor heat source. It will damage the canner’s bottom, warp the canner and not allow the lid to seal properly ever again. Yeah. Happened to me. Why not take the heat of canning outdoors on the burner on my grill…right? WRONG. The result? Buying a new pressure canner. My new pressure canner manual actually says this. The canner I was using was a passed along family one without a manual, so clueless here messed up big time!
TIP 2:
ALWAYS use the rack on the bottom to hold the jars in your pressure canner. You really don’t want to have jars in direct contact with the canner…for pressure OR water bath canning…
TIP 3:
Make sure that your burner matches what your canner can handle. Every burner on stoves have a different amount of heat. I had to research my stove and find out the number of BTUs for each burner to make sure that it matched what worked best for my canner. Electric and gas stoves both have different amounts of heat for all burners. Use the RIGHT burner for your canner.
TIP 4:
Be careful to add the correct amount of water in the canner to begin with…every time. In between canner loads I have emptied water and refilled and made sure that the canner was clean to ensure good results. Speaking of clean—make sure that the gasket is clean and you can add a bit of oil to keep it lubricated occasionally. Also, make certain that you can see light through the lid in the spout that holds the weight before beginning.
TIP 5:
Ensure that the lid is locked when beginning heating. Allow a steady stream of steam out the vent that holds the weight for 10 minutes before adding the weight. When you add the weight, the other gasket should lift and lock preventing another escape of steam.
TIP 6:
Now is when you watch carefully the pressure rise on your pressure gauge. When it gets almost to the pressure desired for canning, I will lower my burner heat to hold the pressure. When the pressure is at the right amount- 10 lbs for green beans- set your timer for 25 minutes processing time. Always begin your processing time when the canner has arrived at the proper pressure.
TIP 7:
WATCH your canner closely during processing, reducing heat if it keeps rising. It’s safest to stay close and monitor during its entire canning. It’s not the best to leave it!
TIP 8:
When processing time has ended, turn off your burner. LEAVE IT to cool off naturally. My BEST tip is to not rush this step! You have to wait until the pressure has gotten to ZERO before removing the weight. BUT, can I tell you that if you do that immediately, and steam rushes out through the steam vent where you took off the vent, that you will have something called syphoning of your jars where liquid will be removed from the jars. NOT a good thing! GIVE IT TIME to cool off…even an hour or several to cool off ensures that your jars will not lose any of the canning liquid in them! So important for sealing, keeping a seal and food safe.
TIP 9:
Always use a jar lifter to remove those jars from the canner when the steam is no longer present when removing the weight. Set jars on a clean towel in a draft free location to cool for 12-24 hours before moving them again. MAKE SURE ALL LIDS HAVE SEALED by indenting. If they did not seal, use immediately or reprocess by removing the lids, cleaning the rims and adding a new seal again before processing.
TIP 10:
Don’t forget to label and date jars and make sure they are all sealed before storing them.
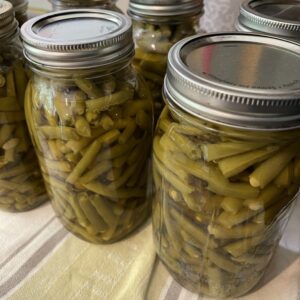
Home Canned Green Beans
Equipment
- 1 Pressure Canner
- quart canning jars, lids and bands
- 1 Jar lifter
- 1 non metallic tool to remove air
- 1 tea kettle easier for filling jars
- 1 measuring spoons
Ingredients
- fresh green beans
- canning salt
Instructions
- Wash green beans in cold water. Remove ends and cut or snap into bite sized pieces.

- Follow your canner instructions on how much water to add to your canner for processing.
- Prepare quart canning jars by washing in hot water. Make sure that all jars are free from nicks on the rim that will prevent sealing.
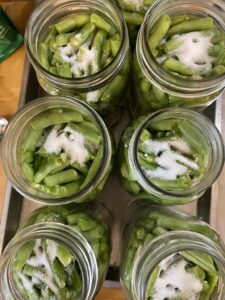
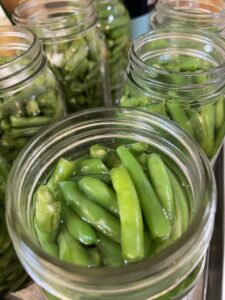
- Pack raw green beans tightly in jars and add 1 t canning salt to each quart; 1/2 t to each pint.
- Fill each jar with hot water leaving an inch head space.TIP: Using an electric tea kettle is so much easier to pour boiling water into the jars.
- Use the nonmetallic canning spatula to release air all around the jar and in the middle of the beans until you don't see bubbles rising. TIP: Air in any canned jars will often force liquid and sometimes overflow of product preventing a safe seal.
- Wipe rims of jars with a damp cloth and add clean unused seals and rings to each jar. Just a tip: Sterilizing rings and caps before adding to jars to can is no longer recommended by lid/ring manufacturers…they may actually prevent them from sealing. NOTE: Rings don't need to be too tightly added.
- Make sure that you begin pressure canning with a clean canner and have checked that your gasket is in good condition and you see light through the steam vent. Add the correct amount of water according to your canner and place the rack in the bottom of the pressure canner.
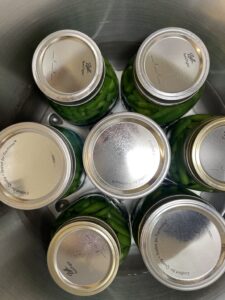
- Add jars to pressure canner on top of the rack.
- Lock on the top and begin heating the canner without the weight on top.
- When steam is running through the vent on top for 10 minutes, add the weight. At this point I have a second steam release that will lift and lock. Each canner is different so follow your manual on operating your canner.
- Once the weight is on and the steam vent is closed, the pressure canner will begin to build pressure. For green beans you want the pressure at 10 pounds for 25 minutes for quarts, 20 minutes for pints. TIP: Begin processing time when the pressure is at 10 pounds.
- NOTE: Don't leave the canner while processing. At 10 pounds pressure, turn down the heat to hold it there and not continue rising.
- Once the processing time is complete, turn off the burner.
- The next step is the difficult one. LEAVE THE CANNER ALONE to cool down. Don't rush it! NOTE: Once the pressure for the canner has gone down to zero, still let it cool down before removing the weight. The longer you leave it, the better it is for holding the liquid in the jars.
- When you remove the weight, NO STEAM should come out of the vent beneath it. If it does, add the weight back to the canner. If not, something called syphoning will happen and the liquid will come out of the jars creating a less than safe seal and product.
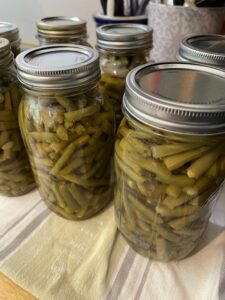
- If there is no steam after the weight is removed, remove the lid from the canner and use a jar lifter to safely remove the jars from the canner. Add them to a draft free area on a dry towel to continue to cool and seal. Make sure all lids have sealed.
- Let them sit for 12 to 24 hours before moving them to your pantry. Don't forget to label and date each sealed jar before storing.
- If jars don't seal, feel free to reprocess them. Make sure that they have enough liquid in them if processing again. You will need to add NEW lids and wipe rims off again before reprocessing, though. NOTE: Discard lids that have been used and/or processed. You don't want to risk them not sealing again and losing all of your produce.
Notes
Can I tell you that pressure canning greens has been done in my kitchen for about the last 40 plus years? Something that I just knew I wanted to learn to do when a family member donated their pressure canner. It’s soooo much easier than you think.
And if you haven’t pressure canned before? Simply follow the canner methods and enjoy all the many things you can add to your pantry. For me? That has been yellow squash, chicken, soups and of course, green beans.
Fast, easy and rewarding!
In case you need tools to begin, I am attaching links for you to shop and click on to find similar items to what I use in my home canning processes. They cost no more for you, but as an affiliate for Walmart, LTK and Amazon, it may provide a small award for me when you shop the links.

Do you need more on canning?
Here’s another overview of water bath and pressure canning here. And here’s more recipes for canning below. Just click on the link:
These are just a few of my favorites. Once you begin the canning…be it waterbath or pressure canning…it might just become a passion.
Hope you enjoy it this summer with fresh produce! Let me know if you “put things up”, too…won’t you?
Happy Canning,


8 Comments
Vickie Ramey
LOVE canned green beans right out of the garden! No canning done here anymore, but glad you’re teaching the next generation!
Leslie J Watkins
Thank you. I just can’t seem to stop canning! Ha!
Cindy Walker
Didn’t know green beans could look so pretty in those jars, but they do!
Leslie J Watkins
thank you, friend! It’s just always a part of my summers! Happy 4th!
Leslie J Watkins
Not only do those jars of canned green beans look pretty…but, my heart is happy when we eat them in the winter! Going to pick more today. Hope you have had a great 4th, friend!
Pingback:
Pingback:
Pingback: