The BEST DIY Gingerbread House Ornaments
You may have seen the cute tiny gingerbread houses that I used for gingerbread house ornaments and served on the hot cocoa bar last year…but…the ones today were just the most fun to create and gift!
Whether you love to make gingerbread houses or would prefer a wooden version of a DIY gingerbread house ornament…here you go!
Here’s the original gingerbread house recipe.

Gingerbread House Recipe
Equipment
- oven
- cookie sheet
- tiny cookie cutters for tiny houses
- Ziplocs or bags and tips for decorating
- Kitchen Aid stand mixer with paddle attachment for gingerbread and whisk attachment for royal icing.
Ingredients
- 8-9 C plain flour
- 2 1/4 C shortening
- 2 C white sugar
- 2 large eggs
- 1 C molasses
- 2/3 C light corn syrup
- 1 T ground ginger
- 2 t ground cinnamon
- 1 t ground cloves
ROYAL ICING
- 5 C powdered confectioner's sugar
- 4 egg whites OR 12 T. liquid egg whites
- 1/2 t cream of tartar
Instructions
- In a large mixing bowl, beat the sugar and shortening until fluffy. I use my Kitchen Aid stand mixer for this with the paddle attachment.
- Add in the eggs, molasses, spices, and corn syrup until mixed.
- GRADUALLY, add 1 C of flour at a time until the dough can be easily formed into a ball.
- Turn the dough onto a lightly floured surface and knead until smooth and not sticky, adding more flour if needed.
- Place in a ziploc bag and chill for several hours or overnight.
- Make your patterns for your house design out of poster board. You will need side walls and roof pieces. Cut out the patterns and make sure that they fit together perfectly.
- Preheat your oven to 350 degrees.
- Place parchment on a cookie sheet large enough to hold all of your pattern pieces. Roll the dough out directly onto the parchment paper on the cookie sheet 1/8" for the small houses…1/4" thick for larger houses.
- Use the tiny cookie cutters for the tiny houses and cut two of each: front/back with doorway; roof; and sides. If you are making larger ones, create patterns out of poster board for the sides, roof and front/back and lay the patterns on the rolled out gingerbread dough and using a knife, cut out each pattern. When all patterns are cut out, remove the excess dough from the cut pieces and place back into the ziploc and into the refrigerator.
- Be careful not to place cut pieces too close together or they will spread and touch one another.
- Bake small houses for 10-12 minutes until done. Larger houses may take 12-14 minutes or until edges just begin to brown.
- When out of the oven, make sure that you cut between any pieces that may have touched one another during baking.For large pieces that you used a pattern, place the pattern back onto the baked pieces and trim off any excess while warm. Waiting until cool will cause the pieces to crack or break.
- Let the pieces cool completely on the cookie sheets.
- Repeat until all pieces are baked.
ROYAL ICING INSTRUCTIONS
- In a stand mixing bowl, beat all ingredients on high with the whisk attachment for 5 minutes or until stiff peaks form and icing is glossy. Keep covered with plastic wrap or a damp dish towel while using.Makes 4 cups.
Notes
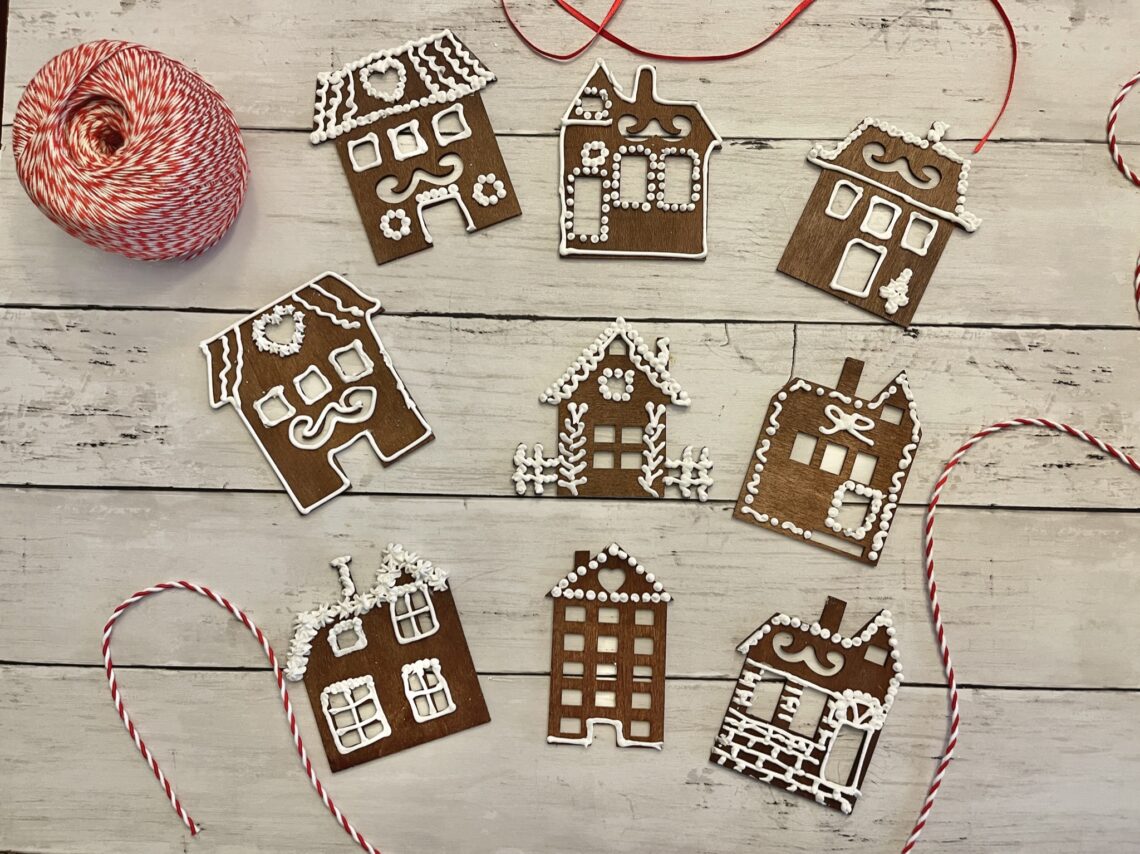
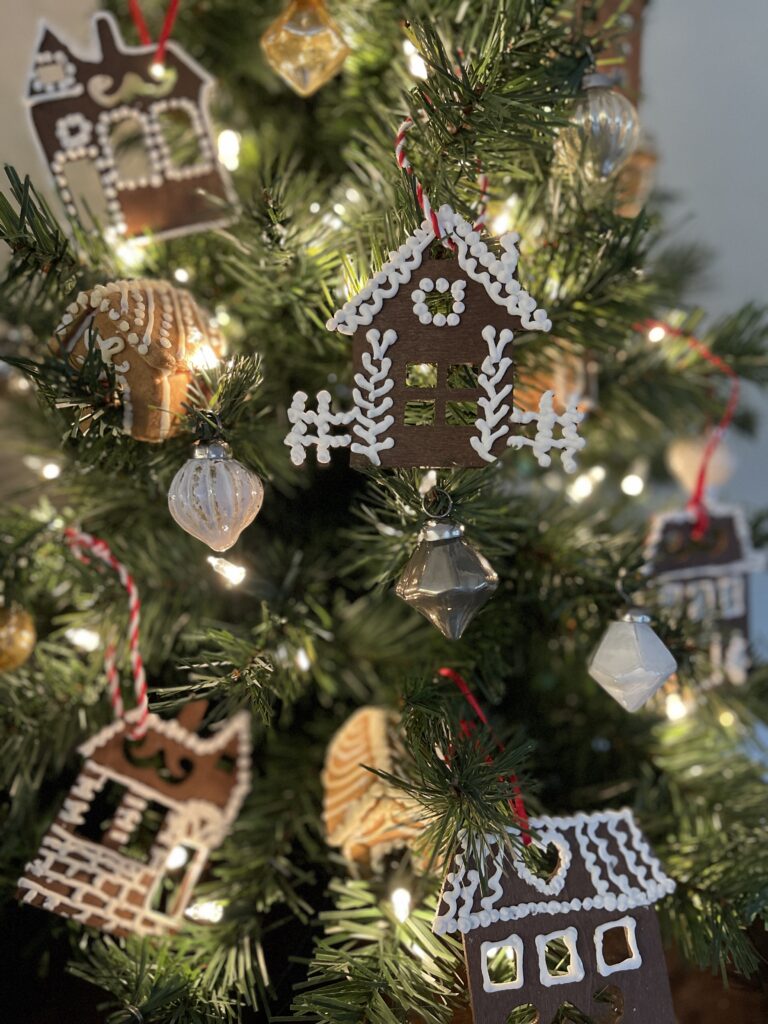
Isn’t this the cutest DIY Gingerbread House Ornament?
Those tiny houses were added to the tree, centerpieces and mantel in addition to the hot cocoa bar. Click on the photo if you need the cookie cutter to make these tiny gingerbread houses.

You know what’s genius about this recipe? It stores indefinitely.
All you have to do after the holidays is tuck them into an air tight container and they are ready to add to next year’s decor…just not for the hot cocoa bar!
But, today? I have a new DIY Gingerbread House Ornament for you.
A friend of mine shared her inspiration of decorating wooden houses with hot glue.
That’s all it took!
Those houses were ordered…here’s the affiliate link to order yours here by clicking on the photo…

Last year I ordered these snowflakes and so the houses were a perfect addition with these on the tree.

Then the gingerbread house ornament fun began!
Last year our family baking day began with those tiny gingerbread houses enjoyed with hot cocoa.
This year? The wooden ornaments decorated with royal icing would be made after the traditional tiny gingerbread houses.
We began with thinking through what would color the wooden ornaments a gingerbread color and yet allow the royal icing to adhere well.
We attempted coloring with black tea and coffee and just didn’t get the intensity that we desired for the gingerbread look.
A can of brown spray paint proved to be the answer to getting a great gingerbread color that made that icing look better.
Wiping it immediately off with paper towels worked well to keep show the wood grain. Don’t forget to let it dry a bit before flipping over to paint the back side. Be careful to make sure that you check both sides so that any paint overspray is wiped off evenly.
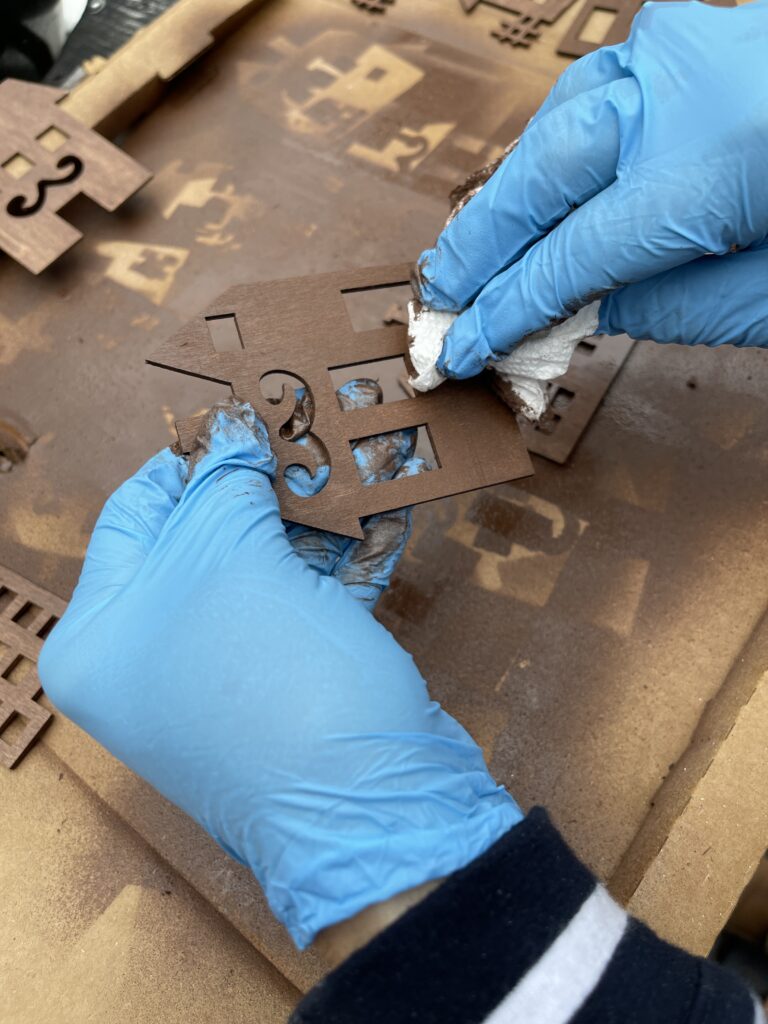
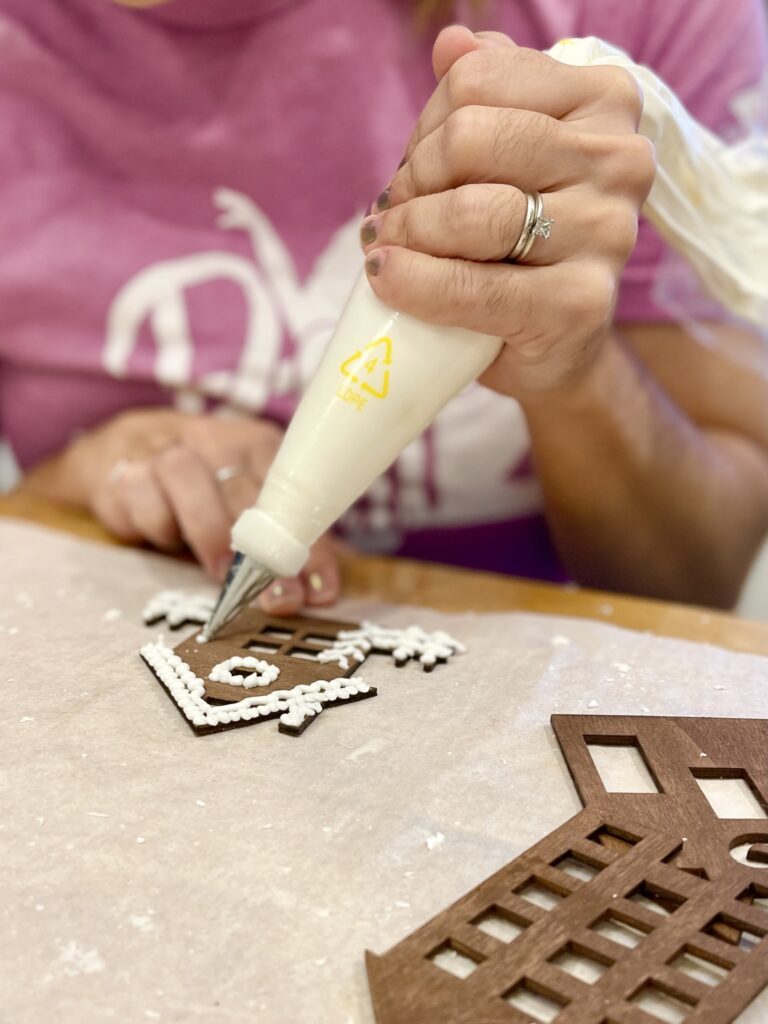
My niece is the genius when it comes to decorating and, again, she worked her magic with decorating the wooden ornaments.
Now, there are two options…
1. Use the wooden ornaments to decorate.
- spray the wooden ornament a soft brown with brown spray paint and immediately wipe off.
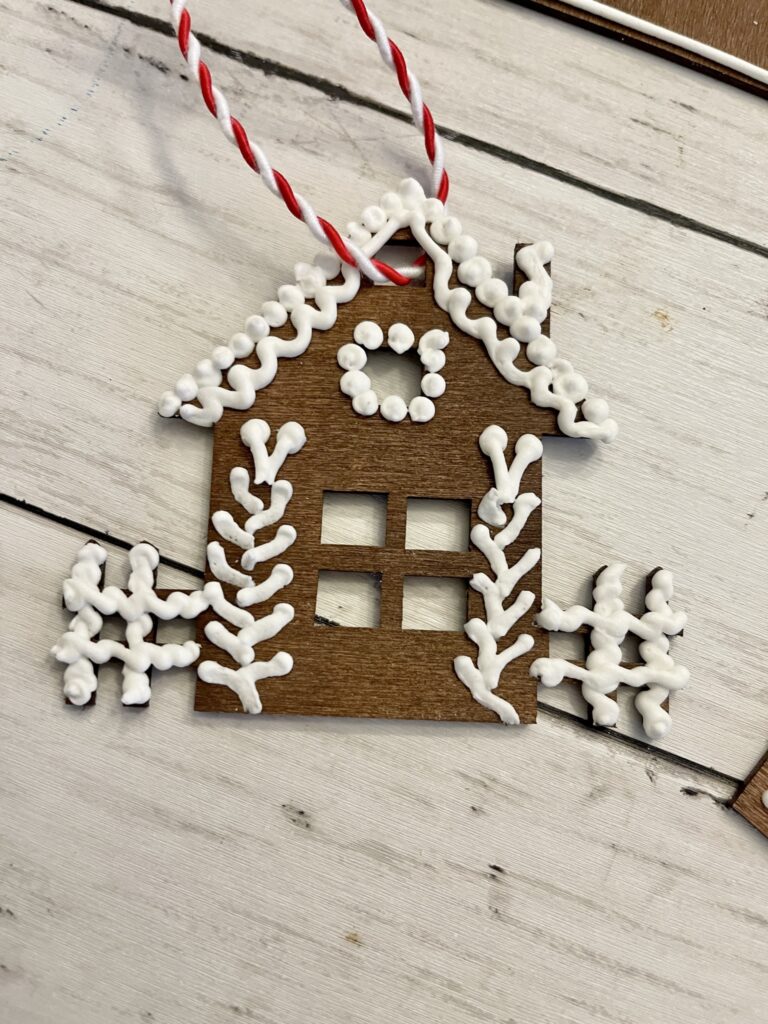
- then use the royal icing to add in all of the white gingerbread details to make them more 3D and realistic.
- next, hang the houses with twine, red velvet or satin ribbon.
2. Use the wooden ornaments as a stencil or template.
- lay the wooden ornaments onto poster board or paper and trace and cut out the image to make a stencil.
- next, make the gingerbread and use the stencils to cut out the gingerbread houses for baking.
- then, decorate with the royal icing.
- add twine, velvet or satin ribbon to hang the houses on your tree.
How do you like them?
Aren’t they the cutest ever? The best addition with those tiny gingerbread houses on the tree.
See how easy these DIY Gingerbread House ornaments are?
If you are a baker…use the houses as your stencil. Next, decorate with royal icing.
If you are a DIY creator…just paint and decorate and hang.
Doesn’t get much easier than that!
So, whether you are making the gingerbread house recipe to create those ornaments OR decorating the wooden ones…you have options!
Seriously, I may have to do both!
Happy Decorating, friends!
Just a note…there are often Amazon and LTK affiliate links added to posts which means I make shopping easy for you at the same cost for you; but provides a tiny commission if you use the shopping links. Thank you if you choose to shop through the links!


8 Comments
Tammy
Leslie, these are adorable ornaments for the tree. How cute!
Leslie J Watkins
Thank you, Tammy. I am such a royal icing fan and they were perfect on these wooden houses. Merry Christmas, sweet friend!
Tracey D. Buchanan
CUTE! So charming!
Leslie J Watkins
Thank you, Tracey! I’d love to see your creativity in action with these! Merry Christmas to you and yours!
Elizabeth
Leslie, I love these! I am going to make these next year.
Leslie J Watkins
aren’t they the cutest? The royal icing made the perfect decorating medium. Merry Christmas, Elizabeth!
Martha+Wallace
My gingerbread houses from long ago finally deteriorated! I need to make new ones! Love the real and the wooden ones! Wonderful post!
Leslie J Watkins
Thanks, Martha! Such a fun addition to the tree!